Table of Contents
- Overview
- Some Demonstrations
- Installation
- Running midiexplorer for the first time
- What is a MIDI file?
- Lakh Clean dataset
- Main
- Links to external websites
- The play button
- The display button
- Internals
- Shortcuts
- Lakh Clean features
- Playlist manager
- Find genres
- Top Hits
- Google search
- Midi Structure View
- Abc Editor
- Piano Roll View
- Pgram View
- Tableau
- Pitch Class Map
- Action Menu
- Pitch Analysis
- pitch distribution
- pitch class
- chordtext
- chordtype algorithm
- chord histogram
- chordgram
- notegram
- keymap
- entropy analysis
- Rhythm Analysis
- onset distribution
- offset distribution
- note duration distribution
- velocity distribution
- velocity map
- beat graph
- Percussion
- After Touch
- Drum Roll View
- PercView
- Mftext
- Database
What is new in version 5.24
The file references in the database MidiDescriptors.txt (version 13) has been changed to be relative to the rootfolder. This makes the database portable to other systems. For example, you can create this database on on a Linux operating system, and then copy it to the appropriate folder in the Windows operating system.
MidiExplorer
Introduction
In the last few years large midi datasets have become freely available for research purposes. For example, The GigaMIDI Dataset with Features for Expressive Music Performance is a collection of 1,437,304 files. Also see https://www.metacreation.net/dataset. This is well beyond what a person can listen to in their life time.
Midiexplorer is a tool that was developed over the past five years to analyze and visualize the contents of a midi file, to explore a large collection of midi files, and to search for midi files with certain characteristics in your collection. It has grown to be quite complicated and this is the reason why this documentation is so large. Not all the features are easy to describe in words, so I have created a few YouTube videos which demonstrate some of its features.
There are numerous free research packages for analyzing midi files. Some of the notable free packages are Cory McKay's jMIR and Michael Scott Cuthbert's Music21, and David Huron's the Humdrum Toolkit.
Unlike these programs, midiexplorer is designed to provide the user with visual and auditory representations of the data. The program can handle very large midi databases; it was tested on a collection as large as 100,000 midi files. If you are using it on such a big collection, it is recommended that the collection be split into many subfolders in a tree like structure. This should speed up the loading of the collection into midiexplorer and scrolling down through the files. If necessary, you could separate the files into folders by the initial letter in the file name (assuming they are sorted in alphabetical order).
Though midiexplorer can run on any collection of midi files, it was designed with with the purpose of analyzing the Lakh Clean Dataset. This is a collection of around 17,000 midi files separated into 2198 folders associated with the artists. You can download this collection from the website Lakh MIDI Dataset v0.1 and scroll down just above the Licensing agreement. It may be tricky downloading and unpacking this collection on the Windows PC operating system. I created a video here showing a way of doing this. On other operating systems such as Linux, there is no problem.
Once you have this collection, you should copy genre.tsv, toppops.csv and the folder lakh_playlist into the root of the lakh_clean directory. I created both genre.tsv and lakh_playlist from searching the internet. They are used by playlist manager and genre finder under the file menu of midiexplorer. The file toppops.csv was derived from the information in the 'Top culture' YouTube channel. Genre.tsv, toppops.csv and lakh_playlist are all included with the source code in the midiexplorer.zip file.
Midiexplorer can be found on https://sourceforge.net/projects/midiexplorer/ which is updated infrequently. The latest source code is posted on https://ifdo.ca/~seymour/runabc/top.html. The source code is written in tcl/tk and therefore you need to install tcl/tk version 8.5 or higher in order to run the source code. On Windows PC, you can download an executable version which has the tcl/tk interpreter embedded.
Midiexplorer is mainly a user interface. It links to numerous free programs that do the work. They include midi2abc, midicopy, abc2midi, abcm2ps, ghostscript, an internet browser, and numerous midi players. Some of the programs such as midi2abc, midicopy, and abc2midi are part of the abcmidi package. Details on how to get these programs will be given later. As the installation of this program with its helper executables is none trivial, more details is given elsewhere; however, for the time being we shall assume that you already have this program running on your system or that you are interested in knowing what it does.
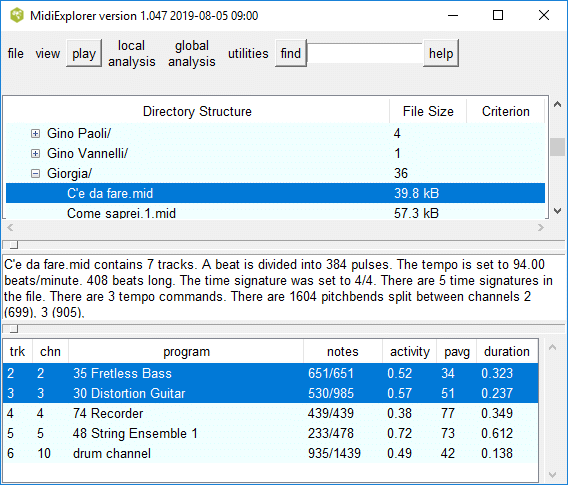
The top level contains a navigation tool, for browsing though a directory of midi files that may be subdivided into many folders. Clicking on any particular midi file will display a short summary in one of several formats. You can also play either the entire or particular tracks or channels the midi file. Other functions allow you to visualize the whole file in various formats such as the pianoroll representation. You can plot the statistical distribution of the note pitches onset times and various other properties. There is a search tool for selecting midi files that have certain characterisitics. Midiexplorer can link to many free and commercial programs through the play button.
Any time you call up a particular function, midiexplorer pops up a new window designed to handle that function. There are more than 25 windows available and by default the windows are placed in the center of the screen resulting in a lot of overlap. Once the window appears, you should move the window to a suitable location on the screen. If those windows are still exposed when you exit the program, midiexplorer will remember the placement of the windows. The next time you call that function, the window will appear in the location you placed it. This feature can be turned off as an option in the file menu on the top left.
Ultimately, the human ear is more effective in extracting and interpreting the information in the midi file. A lot of effort was put in creating different ways of playing the midi file. Besides just playing a particular channel or track of a midi file as a solo, the user can play the file focussing on a particular channel or track.
Demonstrations
I have created several YouTube videos that demonstrate the operation of this program. In order that you can read the text from these screencasts, you should expand the video to your full screen and set the quality to auto 1080p HD.
Updated features of the user interface
Main window controls demonstrates a few of the basic functions in the main window.
Zoom function in pianoroll shows the action of the selection and zoom function.
Connectivity shows how various windows interact with the main window.
AfterTouch demonstrates the AfterFunction for viewing and playing pitchbent notes.
Search shows how to search for midi files with certain properties.
Playmidi shows how the play button can be linked to one of 5 midi applications.
Transposition value demonstrates the effect of changing the transpose value.
Downloading the Clean Midi Dataset demonstrates how to get the Lakh Clean Midi Dataset on your PC.
lakh_clean_bonuses Demonstrates features particular to the lakh_clean dataset.
Musicmap Demonstrates how to use https://musicmap.info to get genre information.
Installing Midiexplorer
Midiexplorer.tcl is mainly a graphical user interface that links to various other executables that do the work. Here is a description on how to install midiexplorer.Windows Operating System
Fortunately on the Windows operating system, you can download and run setup_midiexplorer.exe which you can find on https://sourceforge.net/projects/midiexplorer/files/. The program will install the following programs on your computer
Midiexplorer.exe contains the Tcl/Tk interpreter with the midiexplorer souce code, saving you the trouble of installing the Tcl/Tk system. The other executables with the exception of abcm2ps are part of the abcmidi package. You still need to have a midi player. The Windows Media Player may be adequate. If you plan to create and edit abc files from the midi files, then you will also require Ghostscript which you will need to install separately from https://www.ghostscript.com/
From Source Code
If you would like to run midiexplorer from the source code, midiexplorer.tcl, then you will need to install a Tcl/Tk interpreter for the Windows operating system. You can find Tcl/Tk, version 8.5 or higher versions from https://sourceforge.net/projects/magicsplat/files/magicsplat-tcl/. More information is available from https://www.magicsplat.com/index.html. If you are running the Windows binary version, midiexplorer.exe, this is irrelevant since the binary version was built from version 8.5.17.
Once this is done you merely double click on the midiexplorer.tcl icon to start the program.
The source code of the latest version of the abcmidi package is available from http://ifdo.ca/~seymour/runabc/top.html in the abcMIDI package. It is also available from https://sourceforge.net/projects/abc/files/abcmidi/, but it is not updated frequently. You need a C compiler to create the executables; however, recent versions of the executables for various operating systems can be found on http://abcplus.sourceforge.net/.
Linux Operating System
The tcl/tk interpreter usually comes with Linux so you can merely startup up midiexplorer using wish, egwish midiexplorer.tcl
The other executables such as midicopy, midi2abc, abc2midi, and abcm2ps will have to be created from souce code which you can find on http://ifdo.ca/~seymour/runabc/top.html in the abcMIDI package. Alternatively, you may find some rpms on The abcplus Homepage. TiMidity package is the preferred midi player; however, you will also need good quality sound fonts. A discussion TiMidity player and sound fonts can be found here.
There are some small differences between the behaviour of midiexplorer on Linux and Windows-PC. Unfortunately, I could not find any fixes, but the operation of the program does not depend on these differences.
Midi Player
As mentioned earlier, midiexplorer does not play a midi file on its own, but instead forwards its contents to an existing player on your system for which there are several choices. I shall only discuss the free programs.
Some of the midi players such as TiMidity and Fluidsynth require a soundfont to be linked to the player. The simplest solution is to use a player which already has a soundfont included. On Windows, my favourite is the notation player 4 (free version) http://www.notation.com/Player.php which shows the music notation while it is playing the midi file. Other midi players which include soundfonts are: vanBasco's Karaoke player www.vanbasco.com; MuseScore4, https://musescore.org/en/download, which permits you to create MusicXml files; Rosegarden http://rosegardenmusic.com/.
If the Windows Media Player is on your system you should link the media player to C:/Program Files (x86)/Windows Media Player/wmplayer.exe. Note that midiexplorer requires you to use forwardslashes rather than backslashes.
I tried using FluidSynth, but I did not find a suitable gui which allows me to interrupt the playing of the music.
Though QuickTime can also render midi files, I was not impressed with the quality of the output.
Input Parameters
If you are calling midiexplorer.tcl from a command (terminal) window from another application, you can include the direct path to a midi file as its first argument. Midiexplorer will sent this file to the last open file and you can open it using the cntrl-m shortcut or the File/reload last midi file menu item.TiMidity
I prefer using TiMidity which you can find on TiMidity package For further details on setting up and configuring TiMidity see setting up TiMidity
Starting Midiexplorer for the first time
Midiexplorer saves its state in a file called midiexplorer.ini inside a folder called midiexplorer_home. If this folder and file does not exist, it will be created inside the folder where midiexplorer.tcl is found. Each time midiexplorer is started, the program reads the midiexplorer.ini file in order to restore its current state. The midiexplorer_home folder may contain other temporary files that may be needed. If either the initiation file or the home folder is not found, it will be recreated with the factory settings.
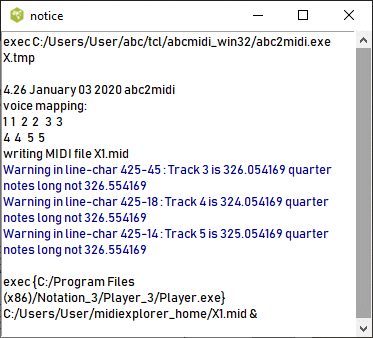
When midiexplorer starts, it verifies that it can access the programs midicopy and midi2abc. Without those programs it cannot do anything useful. You can also do another check by clicking on internals/check version numbers from the top menu buttons. The output should look like
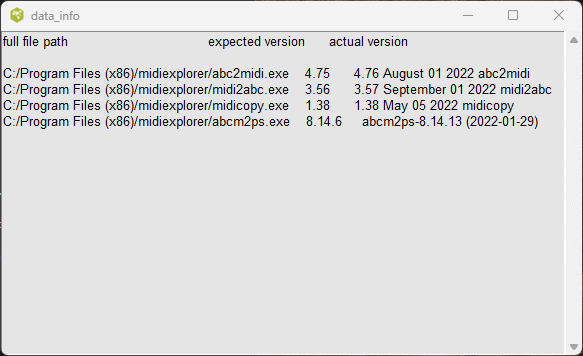
The output indicates where midiexplorer expects to find the executables, the minimum version number, and the actual version number of the executable that it finds. When midiexplorer requests the version number of the executable, it returns the version number with the date of release and the name of the program. If the latest executables are located in another folder, you can click on settings/supporting executables to specify the actual location. If you installed a recent version of midiexplorer on your Windows PC, the following window may appear.
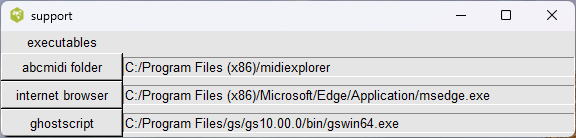
You can enter the path name to the abcmidi executables in the entry box, or preferably call the browser by clicking on the button labeled abcmidi folder. Similarly, you should set the path names to the internet browser. The PostScript viewer is now replaced by ghostscript which is used to convert the PostScript file into a pdf file.
The midiplayer selector has its own window
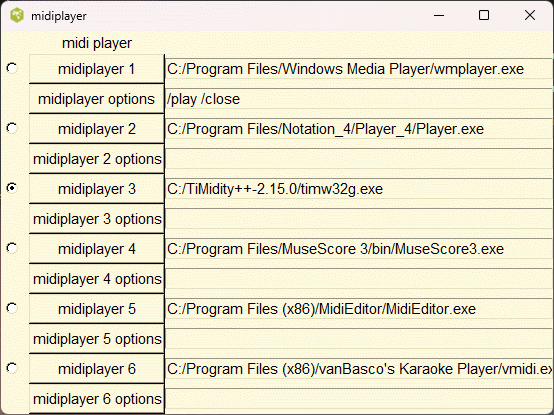
There is room to specify links to six midi players allowing you to switch between players. The radio button to the left of the link indicates the actual player in use. In case, some of the players require you to specify additional options such as the path to the soundfont, there is additional space. My favourites are the player on www.notation.com, TiMidity, and Musecore3. Musecore3 has a mixer under the view menu, which is particular useful for midi files where the accompaniment drowns out the melody line.
Midiexplorer works best when your midi files of interest are located in a directory containing a hierarchical structure where the midi files are fairly evenly distributed in the subfolders. You will need to tell the program the path name to the root directory where the midi files are found by clicking on file/folder browser.
Midiexplorer can be applied to a particular midi file on your drive and not connected to the root directory. The file/open midi file allows you to browse to that file and load it into midiexplorer. This is a useful function for examining that file. Alternatively, you can start midiexplorer from a command or terminal window, following it with the full pathname to the midi file. For example,
wish midiexplorer.tcl C:/music/midi/testfile.mid
What is a MIDI file
In order to make sense of the output of midiexplorer, you need to understand the midi file.
The midi file is a binary file which instructs a midi sequencer and synthesizer how to produce audio output. Like a piano roll, the information tells the midi player when to play each note in the music. Most of the messages consist of note-on and note-off commands.
A midi player may consist of a piece of hardware such as a midi keyboard or a piece of software on your computer. The midi file can be created by an electronic musical instrument such as an electric guitar, wind instrument, keyboard, or drum set. The midi file can also be created by music notation software on a computer. For example, the program abc2midi converts an abc music notation representation into a midi file.
In order to handle more than one musical instrument, the midi commands are assigned to one of 16 midi channels. The channels are numbered from one to sixteen but are represented by a 4 bit number between zero and fifteen. Each channel can be mapped into a specific musical instrument called a midi program. The MIDI Standard defines 128 musical programs.
The pitch of a midi note is defined by 7-bit number where middle C has the value of 60. The pitch values follow the equal tempered scale. The loudness of the note is specified by a 7-bit number called the note velocity.
Channel 10 is reserved for percussion instruments. For this channel, the pitch number is used to specify one of the 47 percussion instrument defined by the MIDI standard.
A midi file may divided in any number of midi tracks. There are two types of midi files in common use. Type 0 consists of only one track while type 1 contains more than one track. By convention a type 1 track contains midi messages that are assigned to only one channel, but this is not a requirement. A type 0 file contains all the channel messages in one track. Midiexplorer handles both types of midi files.
Time in midi files is represented by midi pulse increments. The number of pulses in a quarter note or beat is specified by the PPQN in the header of the midi file. This number ranges between one and four hundred. A beat is always defined as a quarter note in a midi file.
You can see a textual representation of the midi file by clicking 'mftext by beats' or 'mftext by pulses'. Besides noteon and noteoff commands, the midi file can contain many other commands.
Midi files are required to follow particular conventions and syntax. The header indicates the number of tracks that are present. Each track begins with a MTrk header and ends with a special code. It is expected that the file will contain the indicated number of tracks. Unfortunately, some of the midi files that you may encounter may not comply with these requirements. There may be fewer tracks than indicated or the file may end abruptly. Midiexplorer will report these problems and attempt to extract whatever valid data it can find; however, some of the midi players you link to may not accept those files.
Lakh Clean Midi Dataset
The dataset consists mostly of popular music beginning from the sixties. These consist of vocal, rock, rhythm and blues, jazz and many other genres. Each file plays for several minutes. The music generally follows the verse-chorus form but there lots of variations.
The number of instruments (midi programs) varies from one to more than a dozen. Generally, the melody is carried by only one of the instruments. The remaining instruments provide the chordal and rhythmic backing. There is frequently a percussion track which augments the rhythm. One of the goals of this study is to develop an algorithm for identifying the channel carrying the main melody.
The melody is usually performed by the vocalist, but since the Midi player does not imitate the voice of a vocalist, a wind or brass instrument is frequently used. Therefore the midi file can sound very different from the real performance. The view/google search menu button will automatically find a Youtube video of a live performance corresponding to the selected file.
There are numerous research documents based on this database. (Google search with the key words Lakh midi dataset research pdf.) Also see my own work.
Main Window
The main window consists of 2 frames stacked vertically. The amount of vertical space they occupy can be adjusted by shifting the two sashes.
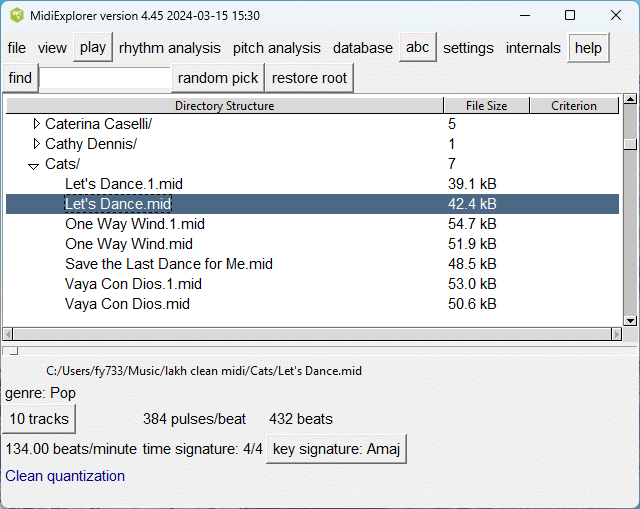
All the menus and buttons occur along the top of the top frame. A tree view representation of the subdirectories of the selected directory appears below. Icons looking like a plus sign (or minus sign) inside a box are used to open (or close) the subdirectories. On Linux, the same icons appears as triangles pointing right or down. You navigate through the directory, by scrolling downwards and opening or closing the subdirectories of interest. If the subfolder contains only one MIDI file, there is an option to have this subfolder opened automatically.
The column labeled 'File Size' indicates either the number of files (or folders) in the subdirectory, or the size of the midi file. The last column 'Criterion' is used when you are doing a search and indicates how well the listed midi file complies with your request.
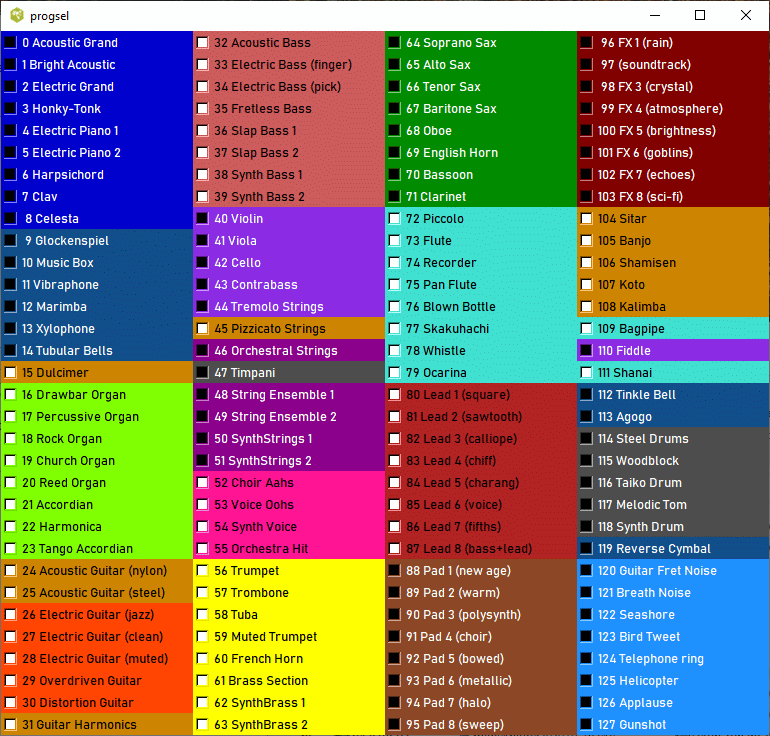
The above image shows how the Lakh clean MIDI dataset appears in this program. This dataset contains many subfolders where each subfolder is named after the artist.
Once you select a midi file in the directory, the lower frame displays the global characteristics of the file. The buttons is the lower frame, (eg. 10 tracks, key:Cmaj, and Clean Quantization) open other windows which provide further information. The Clean Quantization button describes how the midi noteon commands are quantized. It opens a beat graph. window described in the Rhythm Analysis section. The key signature button opens a rminmaj key signature graph. There is also some information when you click the help button in that window.
If the collection of midi files comes with a file genre.tsv then the specific genre of that file will appear below the file path.
The button indicating the number of tracks in the file acts line the menu button file/track info. A separate window describing the individual tracks or channels in the midi file will pop up if that button is clicked.
A one track file is particular midi format which does not separate the midi channels into separate tracks. A few midi files may be split into 40 or more tracks; however, most of these tracks may be empty. You can view the textual contents of these tracks using the view/mftext menu button.
The pulses/beat indicates the temporal resolution of the notes. The beat refers to a note which is one quarter in length, irrespective of the time signature. The resolution needs to be high enough to handle short notes like 1/32 and triplets, so it factors into some power of 2 and the number 3. I found it could vary between 24 and 1024.
The length of the longest track is given in beats.
The other information -- beats/minute, time signature, and key signature -- may not be present in the midi file. If they are not indicated, they assume the default values of 120 beats/minute, 4/4 time and the key signature. The midi file rarely indicates the key of the music; therefore midiexplorer attempts to figure out the key signature based on the pitch class histogram. For some files, the key may shift over the music and the algorithm cannot determine the key with sufficient confidence. When this occurs, the summary states that the key is unknown.
In addition to these values, midiexplorer may show other unusual global characteristics printed in dark blue. The label unquantized indicates that the note positions and length were not quantized to lie on a grid. This can be verified from the rhythm analysis/ menu buttons onset distribution, offset distribution and beat graph which are described in this document.
If lyrics meta data is present in the midi file, has lyrics will appear.
Triplets present indicates that three notes being played in the time of two notes occur in this file.
Simple rhythm indicates that most of the notes are quarter notes or longer.
More details will be added in future versions of this program.
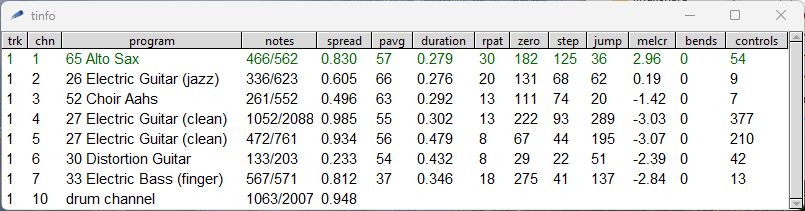
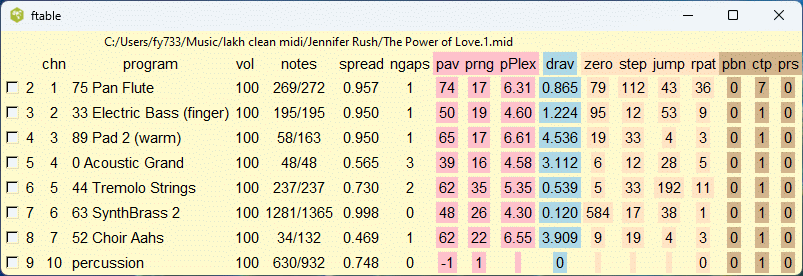
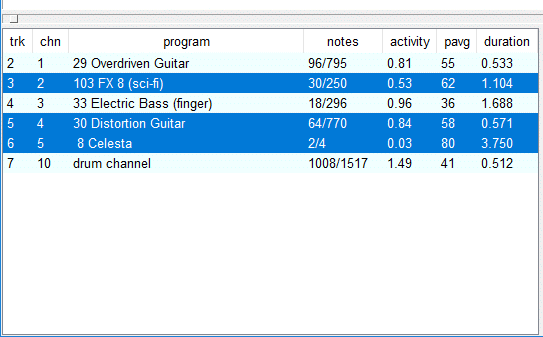
Track info
 This window is accessed by either the menu button view/track info
or the button labeled 'n tracks' where n is a number.
The track info window as shown above presents descriptors
of each of the tracks or channels in the midi file in the
form of a table. There about 12 different descriptors using
various names in the table column headers. Details will be
explained below. The purpose of these descriptors is to indicate
how the track or channel is used in the midi file. The most
meaningful information is the name of the instrument (midi program)
for that channel or track. In most cases, this instrument
is fixed; however, I have encountered some midi files where
more than one program changes occurs in the midi file. If you
encounter such a file, you can see these changes using the
view/midi structure tool.
This window is accessed by either the menu button view/track info
or the button labeled 'n tracks' where n is a number.
The track info window as shown above presents descriptors
of each of the tracks or channels in the midi file in the
form of a table. There about 12 different descriptors using
various names in the table column headers. Details will be
explained below. The purpose of these descriptors is to indicate
how the track or channel is used in the midi file. The most
meaningful information is the name of the instrument (midi program)
for that channel or track. In most cases, this instrument
is fixed; however, I have encountered some midi files where
more than one program changes occurs in the midi file. If you
encounter such a file, you can see these changes using the
view/midi structure tool.
Midiexplorer attempts to deduce and indicate the function of the track (or channel) using the given descriptors. For example, dark green text is used to indicate that the melody is found in this track. Purple is used to indicate that the track is used to contain the rhythmic-chordal accompaniment. Maroon is used to indicate that the track contains the bass line. Blue is used to indicate that the track contains many chords. This is an experimental feature, and may not be completely accurate.
It is important to note that you can select one or more tracks or channels by clicking on that line. This selection may apply to other functions or tools in this program. Normally when you select one line, the other selected lines become deselected. Holding the ctrl button on your keyboard allows you to select other lines without deselecting the other lines. The ctrl button also provides a means of deselecting a selected line. On other windows, such as the tableau you use checkbuttons to choose the track or channel. These selections are important when you use the play, display and abc> buttons in the main window. They also apply to the rhythm analysis and pitch analysis menu options. Therefore the track info window is very useful in performing the analysis of a midi file.
Here is an explanation of the different channel/track descriptors. The first instrument (program) assigned to this track or channel is given.
The notes column contains two numbers separated by a slash. The second number is the total number of notes for that channel including any notes associated with the chords. The first number is the number of chords or notes if there are no chords. Thus if the two numbers are equal, this implies that all the notes occur alone. If the second number is 3 times as large, then the notes belong to chords with at least 3 notes on the average.
The spread indicates how the channel notes are distributed over time. Some instruments like the Acoustic Guitar plays continuously over the entire duration of the midi file. It has a spread of 1.000. In contrast another plays intermittently, and there are large time gaps when this channel is not active. The spread is the ratio of the time that the channel is playing over the total time of that channel. The functions, view/midi structure and view/tableau present graphical representations of the channels.
The column labeled pavg indicates the average midi pitch value of the notes that were playing. The midi pitch is given as a number from 1 to 127 where middle C is 60. Higher pitches are more salient and often carry the melody.
The duration column indicates the average duration of the notes in beat units. If most of the notes are short eigth notes then the average duration will be small. Similarly, if most of the notes are long whole notes, then the average duration will be large.
The next four columns rpat, zero, step, jump contain information on the relationships of the notes in the channel or track. They are useful for deciding whether the track contains the main melody, or harmonic and rhythmic backing.
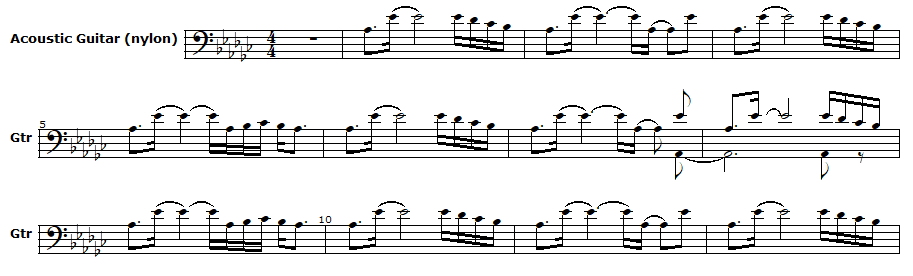
rpat indicates the number of distinct rhythms that occur in this track (or channel). For example, the following excerpt contains few rhythm patterns which occur repeatedly.
The next three columns refer to the relationships between the note (or chord) and its next neighbour. Zero is a count of the number of times the next note does not change pitch. For example, in some tracks the same pitch is played repeatedly, but the rhythm may vary.

In the melody line, the pitch changes by small steps (one or two semitones), there are few jumps (pitch changes greater than two semitones), and not too many pitch repetitions. The rhythm patterns also vary.

You should beware that the bass line has the characteristics of the melody line; however, the average pitch is usually in the range of 30 to 40 rather than above 60.
The next column labeled melcr shows the melody criterion for identifying the channel or track containing the melody. The melody track or channel is highlighted in dark green; though on the windows operating system, tcl/tk may highlight this line in a different manner. The melcr values generally fall in the range of (-5,5) and high values imply a melodic line. (This is a new feature in still in development. The value is computed from a linear discriminant model using the rpat, pitch changes parameters, and the midi program number.)
A channel or track may appear in purple, if it is used as rhythmic chordal support. This channel (or track) may be useful in determining the music progressions in this work. In order to be labeled as rhythmic chordal support, the line should be mostly chords consisting of two or more notes, the number of rhythm patterns should be 10 or less, and few pitch changes (nzeros - nsteps > 100).
A lot of midi files contain pitchbends which modulate the pitch of a guitar note while it is playing. In the following example, the last note played on a distortion guitar is a bent note producing a nice effect. Here are more interesting examples. The first example is an extract from the '2 Unlimited' band. Compare this with the second example where the pitch bends have been suppressed. The number of pitchbend commands is given in the summary.
Most midi files are played at a single tempo; however,
a few files may vary the tempo. Midiexplorer does not compensate
for tempo variations.
The algorithm used to generate this plot is explained in the
section called 'pitch class distribution'. The button labeled
'pitch class' is a short cut to the pitch class histogram plot.
Some of the applications called by midiexplorer such as musescore4
will automatically convert the midi file to sheet music. This is
useful if you are trying to play the music on your own instrument.
Some of the music that you encounter may be composed in an unusual
or awkward key signature. As a convenience, you can transpose
the music in the midi file by a specific number of semitones in order
to get a more suitable key signature.
In order to get to shift to a specific key, you need to determine
the number of semitones that you need to get to the new key. The
botton transpose by displays a diagram below that will assist
you in counting the semitones.
If you change the transpose value, the midi file will be played and displayed
with this transposition. This is value is reset to zero whenever
zero semitones when you select this file again or any other file.
Note that the transpose value will affect some of the plots such
as pitch analysis/pitch distribution,
pitch analysis/pitchclass plot,chordgram,
notegram, keymap and some others.
This experimental window was introduced in order to study the
differences between the melodic, rhythmic-chordal, and bass lines
in the midi file.
The detailed track window contains the same information plus more.
The headings of the columns are highly abbreviated in order to keep
the column widths small. Hovering the mouse pointer over one of the
headings will produce a tooltip with an explanation. Here are the
new variables.
When the spread of a track (or channel) is less than 1.0, there
may be a number of gaps where the instrument is silent for more than
8 beats. ngaps indicates the number of these gaps for that
track or channel.
Midiexplorer refers to a genre database (genre.tsv) which is
stored in the root music folder. If the database contains the
genre associated with the current midi file, it will display
that after the full file name. The genre is not exact but just a
guide. The genre.tsv is a plain text file which you can modify
it using a text editor. If you use the view/google genre menu
button to find the genre, the function may automatically update
this database.
In the settings/supporting executables configuration
window, you should specify the path to an internet browser that
midiexplorer can use. This browser is called by various controls
in this program. In particular it is used when you click on
help/Web Help. On Windows 11, the default is to use the
Edge Browser, and on Linux the default is to use the FireFox
browser.
The browser is also used by other controls such as
Assuming you are using the lakh clean midi dataset, midiexplorer
extracts the artist and title of the midi file from the path name.
View/google search looks for the videos associated with this artist
and title on YouTube and allows you to play this file. View/google
genre requests Google to look for the genre of this item.
View/duckduckgo relies on the DuckDuckgo search engine.
In midiexplorer versions 4.96 and higher, I have added a link
to www.music-map.com which recommends other artists with similar
taste. The View/musicmap similar opens that link.
Finally the file/musicmap genre info goes to the musicmap.info
web site where you can get information specific to a particular genre.
I have created a short YouTube video Musicmap
demonstrating how you could use this web site.
The play button is probably the most important button and
occurs in many of the windows. The button sends the selected
midi file or the selected portion of the midi file to the
midi player that you have chosen. As discussed in the earlier
section, 'Starting Midiexplorer for the first time',
you can link midiexplorer to as many as 6 different midi
applications. Using one of the radio buttons, you can
specify which application to activate when you click
the play button. You can get to this setting using the
cntl-p shortcut or look for it in the settings menu.
The play button in the main menu will play the entire
midi file on the designated midi player; however, you
can select particular tracks or channels by clicking on
one or more of the tracks. These tracks will be highlighted
in blue as shown below.
If you left click on the play button, then only the selected
tracks will be played. Right clicking on the play button will
play all the tracks or channels in the file. The pitch, rhythm
analysis menus also applies to those selected tracks, but this
will be discussed later.
At this point you can view the midi file in various forms using
the view menu button on the top line of the window.
The different view representations will be described
next.
This button is equivalent to pressing the abc button followed by the
display button in the abc output window which just popped up. The program
will generate a temporary abc file using midi2abc for the selectected
tracks or channels, convert the abc file into a pdf file containing
the score using abcm2ps, and then display the pdf file using your
browser.
The software does not handle well the midi files with nonquantized note onset
times. If you are after the music score, you should try forwarding the
file to the musescore4 application.
You may skip reading this section assuming that midiexplorer is
running correctly on your system. Otherwise, you may need to
use these functions to diagnose your problem.
The external programs, midi2abc and midicopy, form the core
of this program. These programs are part of the midiabc package.
Each time you start up midiexplorer, it verifies
that it can find these programs and that they are the correct
version numbers. If this is not successful, a message box
will pop up on your screen with a warning. In this case
you will need install these programs, go to settings, and
indicate the location of these programs.
The console is designed for following the communications
of midiexplorer with the 'outside world'.
Typically, midiexplorer calls an external program such
as midi2abc or midicopy, specifying the path to the
input midi file and using runtime parameters to
indicate what to do. The program may may create a temporary file
which is stored in the midiexplorer_home folder.
The external program returns some messages
that midiexplorer attempts to interpret.
In most situations, midiexplorer runs normally,
the console just reports that the program was executed
without any issue, and any returned messages are displayed.
However, when midiexplorer fails to execute a
command, the contents of the console is useful to
identify the problem. Various things can go wrong;
midiexplorer does not find the external executable;
the program may fail to run or crashes before it returns
any results; or the midi file may be defective.
Midi2abc and midicopy are independent executables
that can be run directly from a terminal on Linux or
a command window (now called power shell) on Windows.
When you click on a different midi file from the
main window, midi2abc is called with the -stats
runtime parameter. Midi2abc analyzes the tracks or
channels of the midi file and prints out copious
information (which is not well documented). Midiexplorer
gets this information and puts this in a form that
is displayed on the screen.
Midicopy is called whenever you do anything else
with the file. For example, if you want to play a
specific track or any part of the midi file, midicopy
extracts this information and records in a temporary
file called tmp.mid. This temporary file is then
forwarded to another external program which plays
the midi file. Midicopy is quite a powerful program
that can have many other uses. There is not much
documentation other than running midicopy without
any arguments.
For further details also see Operations.
Many of the functions in midiexplorer are buried
in one of the many menus. You can use certain key strokes
to get to some of these functions. Here is a table
of these shortcuts.
Key signature
The main window also indicates the key signature of the midi
file. Unfortunately, one cannot rely on the midi file to specify
the key signature, so it is necessary to estimate the key
by correlating the pitch class distribution with the distributions
expected for the key. Clicking on the button in the main window
labeled 'key signature: Amaj' will display a plot showing the
correlations with the different major and minor keys.
Key signature transposition
Detailed track info
pav is the average pitch of the notes.
prng is the range of pitches in semitone units of the notes.
pPlex is the perplexity of the pitch class distribution. This
is computed by taking 2 to the power of the pitch class entropy. The value
is close to the number of active pitch classes.
drav is the average note duration in beat units.
zero, step, jump describe the relation between the note
and its immediate neighbour. zero indicates the number of notes
whose pitches do not change. step indicates the number of notes
whose pitches change by 1 to 3 semitones. jump indicates the
number of notes whose pitches change by 4 or more semitones. In the
case of chords, only the top note is compared. Melodic lines should
have a higher count for the step parameter.
pbn number of pitchbends
ctp number of control messages
prs number of pressure messages
vel average velocity
vels velocity standard deviation
Music Genre
Links to external web sites
google search
google genre
google chord progression
musicmap similar
and duckduckgo
In addition it is also used by file/musicmap genre info.
The Play Button
The Display Button
Internals
Console
Some background material
If you are curious to understand how midiexplorer works,
continue reading this subsection. The abcmidi package
has two programs which deal with midi files. Midi2abc is the
oldest program which was designed primarily to convert
midi files to abc music notation files. Rather than
create new programs, midi2abc was expanded to do other
tasks such as analyzing midi files. The other abcmidi
program is midicopy which was created later. Both of
these programs form the core of midiexplorer.
Check version numbers
You would run this function if you have just
updated the midiexplorer source code or updated the
external executables midi2abc and midicopy.
Midiexplorer pops up a window which may look like this.
Mftext of output midi file
It is unlikely that you will need this function.
In many situations midiexplorer runs midicopy in order
to extract particular channels or tracks at a specific
time interval and save the results in tmp.mid. This
function shows a text representation of tmp.mid.
Save output midi file
This allows you to rename tmp.mid and save it somewhere.
Contents of midiexplorer_home
This function saves you the trouble of finding the
midiexplorer_home folder and viewing its contents.
Midistats output
Unless you are interested in how midiexplorer works,
you can ignore this function. There is more details in
the section Operations.
Shortcuts
| aftertouch | cntl-a |
| chordgram | cntl-h |
| console | cntl-k |
| google search | cntl-o |
| midi player setup | cntl-p |
| piano roll | cntl-r |
| midi structure | cntl-s |
| tableau | cntl-t |
| duck duck go search | cntl-u |
| play midi file | cntl-w |
| keymap | cntl-y |
Lakh Clean Dataset features
Midiexplorer has a number of features which were designed to work with the Lakh Clean Dataset (LCD). The LCD is structured into many subfolders where each subfolder is named after the artist and contains the midi files of the music produced by the artist. To use these features for the LCD you will need to add certain files and folders into the LCD directory as they do not come with LCD. You can find these additional files and folders in the midiexplorer source code. Those included files and folders were created using information extracted from numerous web pages on the internet.
The following (LCD) features playlist manager, genre finder and top hits are accessible from the top file menu and are described here.
Playlist Manager
You find the playlist manager as one of the options under the file menu. This tool allows you to get quick access to LCD folders (artists) associated with a particular genre. For example the LCD references more than 2200 artists.
To use this feature you need to add a folder called playlists into the LCD directory. If this folder is not found, you will get an error message stating the midiexplorer was looking for this folder. All of these files are plain text and you are free to edit them.
The playlist manager displays two listboxes - left and right. The left box lists all the distinct genres. The right listbox will display a list of artists (subfolders) associated with the genre that you clicked on in the left listbox. When you click on subfolder name in the right listbox, midiexplorer will automatically open this folder and list its contents.
If this folder contains a file called definitions.text, the program will display a short definition of the selected genre. A sample image of the playlist manager is shown here.
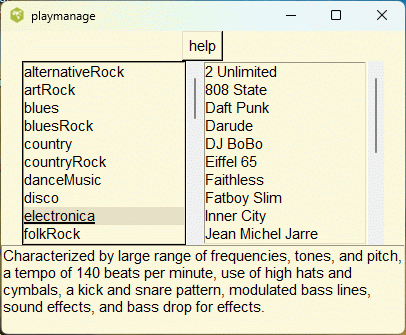
Since many of the artists in the lakh clean dataset have produced music in different genres, so not all the midi files in that subfolder are of the same genre. The next feature genre finder provides an alternative approach.
Find Genres
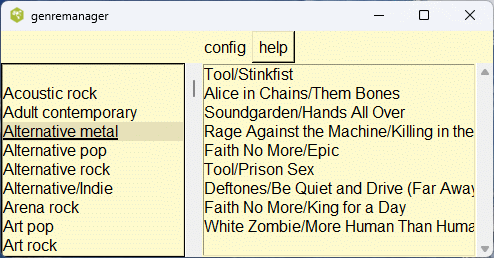
To use this tool, you need to put the file genre.tsv (which comes with midiexplorer.zip), into the Lakh Clean directory in your system. The function runs in the same manner as the playlist manager described above. Click on one of the items in the left listbox and then click on an item in the right listbox. The midi files associated with that genre will appear in the main window. The config button allows you to sort the genres by alphabet or frequency.
The genre.tsv is a plain text file which you can open with any text editor or spread sheet application. Most of the entries were entered manually by querying Google using the cntrl-g key stroke or view/google genre. About 190 different genres were identified. Many of the files were assigned to Pop or Rock. There may be a lot of overlap. For example, there may not be much distinction between Reggae or Reggae rock. A lot of the music is a fusion of several different genres. For example, when I requested the genre of the Beatles A Day in the Life, google returned 8 answers (Psychedelic rock, Alternative/Indie, Samba and Pagode, Art rock, Orchestral pop, Rock en Espanol, Rock, and Folk). Some of the genres such as Alternative/Indie refer to the origin of the work rather than just the style of the music.
Nevertheless the tool is useful for finding some examples of genres like Jazz or Heavy Metal.
The genre.tsv file is available only for the Lakh Clean dataset. It is still full of some inconsistencies. For other datasets, you will need to create your own file.
Here is a list of all the distinct genres in the genre.tsv file. The values inside the parentheses are the number of times this genre was encountered.
| Rock blues (1) | Surf music (1) | Indian classical music (2) | March (3) |
| Lebanese pop (3) | New jack swing (3) | Symphonic rock (3) | Downtempo (3) |
| Classical jazz (3) | Comedy rock (3) | Funk/Soul (3) | Eurodance pop (3) |
| Wagnerian rock (3) | Country blues (3) | Instrumental (3) | Boogie-woogie (3) |
| Big beat (4) | Reggae fusion (4) | Alternative pop (4) | Progressive soul (4) |
| Funk metal (4) | Bluegrass (4) | Progressive house (4) | Rock opera (4) |
| Indie rock (4) | Bolero (4) | Ska (4) | Contemporary Christian (4) |
| Bebop (4) | Christian (4) | Teen pop (4) | Forro (4) |
| Psychedelic folk (4) | Orchestral pop (4) | Italo pop (4) | Polka (4) |
| Disco funk (4) | Rock pop (4) | Nederpop (4) | Italo disco (4) |
| Skate punk (4) | Easy Listening (4) | Post-punk (5) | Eurohouse (5) |
| Jangle pop (5) | Pop soul (5) | Tropipop (5) | Dance/electronic (5) |
| French Indie (5) | Novelty song (5) | Experimental pop (5) | Contemporary folk (6) |
| Classical pop (6) | Industrial metal (6) | Comedy (6) | Operatic pop (6) |
| Gothic rock (6) | Philadelphia soul (6) | Ragtime (6) | Smooth jazz (7) |
| Pop holiday (7) | Brill Building (7) | Vocal jazz (7) | Eurodisco (7) |
| Dance (7) | House (7) | French pop (7) | Jazz funk (7) |
| Rap metal (7) | Groove metal (8) | Acoustic rock (8) | Trance (8) |
| Russian pop (8) | Ska punk (8) | Classic soul (8) | Singer songwriter (8) |
| Songwriter (8) | Reggae rock (8) | Psychedelic music (8) | Sunshine pop (8) |
| Psychedelic soul (9) | Electropop (9) | Synth-rock (9) | Alternative metal (9) |
| Christmas music (9) | Latin rock (9) | Jazz pop (9) | Bossa nova (9) |
| Film score (10) | Gospel (10) | Halloween (10) | Funk rock (11) |
| Sertanejo (11) | Art pop (11) | Electronic rock (11) | Musica tropicale (11) |
| Dance pop (11) | Britpop (11) | Arena rock (11) | Bubblegum pop (11) |
| Dance-rock (11) | Post-grunge (12) | Traditional pop music (12) | Big band (12) |
| Funk soul (12) | Progressive pop (12) | Beat music (12) | Southern rock (12) |
| Musical (14) | Jazz rock (14) | Opera (14) | Europop (15) |
| Mandarin pop (15) | House music (15) | Soul (16) | Power pop (16) |
| Garage rock (16) | Instrumental rock (16) | Holiday (16) | Blue-eyed soul (16) |
| Progressive metal (17) | Jazz fusion (17) | Pop punk (17) | Chanson francaise (17) |
| Psychedelic pop (17) | Heartland rock (18) | New-age music (18) | Post-disco (18) |
| Chanson (18) | Roots rock (18) | Folk pop (19) | Art rock (20) |
| Country pop (20) | Electronica (20) | Electronic pop (21) | Record label (21) |
| Industrial rock (22) | Nu metal (22) | Show tune (23) | Thrash metal (23) |
| Rockabilly (25) | Traditional pop (25) | Folk world (26) | Doo-wop (28) |
| Baroque (29) | Glam rock (30) | Baroque pop (30) | Glam metal (32) |
| Country rock (35) | Techno (36) | New wave (37) | Latin pop (38) |
| MPB (40) | Punk rock (41) | Psychedelic rock (45) | Electronic (49) |
| Rag (49) | Adult contemporary (51) | Singer-songwriter (52) | Blues (58) |
| Blues rock (65) | Grunge (68) | Eurodance (69) | Heavy metal (73) |
| New wave music (75) | Dance-pop (77) | Funk (77) | Folk (81) |
| Contemporary R&B (81) | Easy listening (82) | Reggae (82) | Metal (87) |
| Classic rock (97) | Disco (99) | New age (101) | Hip-hop (107) |
| Synth-pop (112) | Soul music (119) | Children's music (125) | Dance/Electronic (143) |
| Progressive rock (151) | Folk rock (159) | R&B (159) | Rock and roll (169) |
| Schlager & Volksmusik (176) | Alternative rock (180) | Classical (197) | Country (207) |
| Hard rock (259) | Soft rock (261) | R&B/Soul (305) | Jazz (335) |
| Alternative/Indie (459) | Pop rock (536) | Rock (872) | Pop (2010) |
Top Hits
The interface uses the same interface as the Genre Finder. Based on the information from the https://www.youtube.com/@TopCultureTV web site, I compiled a list of midi files in the Lakh Clean dataset that could be linked to the monthly popular songs. The interface looks for the toppops.csv file in the Lakh Clean dataset. This file is not part of the downloaded Lakh Clean dataset but is included with the midiexplorer source code. It is a plain text file.
Google Search
You find the google search option in the view menu button. This command opens your internet browser to the google web page, and sends a search request for the artist and title corresponding to your active midi file. If you are lucky, google will find a video of the artist performing the selected title.
In order for this to work the path to the selected midi file should look like this
c:/../artist/title.midFor example on my computer a sample file in the root folder /home/~seymour/clean_midi/ contains the midi file
The Beach Boys/California Girls.midThe google seach command will send this command on my system.
firefox https://www.google.ca/search?q=The+Beach+Boys+California+GirlsYour internet browser is started and displays the results for google's search request.
Midi Structure View
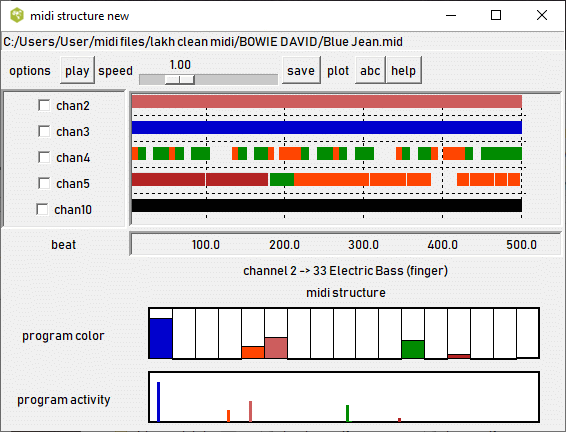
The 'Midi Structure' shows the time intervals when a particular channel or track is active. Each of the midi channels (or tracks) is assigned to a particular musical instrument called a 'program'. Midiexplorer groups the midi programs into 17 classes (e.g. piano, wind, brass, etc.) and assigns the classes different colors as shown below.
Though it is not common for the program assignment to change several times in the middle of the midi file, this is sometimes occurs as seen in the above example.
When the mouse pointer lies inside one of the active regions, part of the region will be highlighted bright red and a status line at the bottom of the window will indicate the type of musical instrument.
The check buttons on the left side, allow you to select specific channels or tracks for special treatment. The options button window allows you to specify how these channels are treated when you click the play button.
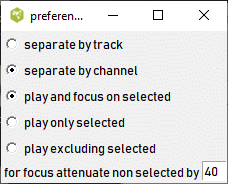
For example, if you choose to focus on those channels, then the other channels will be attenuated by the amount specified in the entry box.
For multi-track midifiles (type 1), you can separate the output by either tracks or channels.
You can select a specific time interval area in the midi file as shown below.

To select a region, hold the left mouse button down and sweep over the area of interest. To remove the selected region, double click the mouse anywhere in the diagram. The play and other buttons in the midistructure window will only apply to this region and selections. Furthermore, the play button in the main window will also apply to this region as long as the midistructure window is exposed. The pitch-rhythm/analysis menu plots will also be restricted to this region. Changing the region or channel selection, will cause these plots to be updated automatically.
The lower half of the midistructure window shows two plots labeled program color and program activity. These plots show the weighted number of notes which belong to a particular program group, program or pitch class. The notes are weighted by their duration. A few notes that play continuously over several bars can have a larger impact than many notes that play for a fraction of a beat. The program color indicates the balance of instruments in the midi file -- for example, whether there are a lot of brass instruments or string instruments.
The program activity plot is a finer representation of the distribution of notes among the 128 MIDI programs. The height of the line represents the amount of activity in a particular MIDI program. The lines are color coded by program color.
As a convenience the midistructure window is linked with the summary frame (lower frame) in the main window. If you select tracks or channels in the main frame, they will become checked in the midistructure window. (Click on the track row to select. Hold the keyboard control button or shift button down while mouse clicking for other selection options.)
Abc editor
Abc music notation is one of the many music notation standards which is explained in the YouTube video . There are over 100,000 abc files, that you can download from the internet. https://abcnotation.com/tunes. Midiexplorer has limited support for converting a midi file to abc notation and making minor edits.

This editor is customised to work specifically with the midi2abc extensive output of the active midi file extensive. In this output, the voices are separated (not interleaved) and each bar or measure is presented in a separate line. You activate this editor by clicking on the abc button on the top right of the midistructure window, or the main window. If no channels or tracks or region are selected, then the results apply to the entire file. To ease navigation through this data, the voices are elided and displayed in blue. Clicking on any of these voices will reveal the associated measures. The bar numbers are shown in the left column but may not maintain synchrony if you add or remove a line. Clicking the recalc button will restore synchrony. You can save the edited abc notation to a file of your choice.
There are two display buttons. The display button will convert the abc notation into sheet music using the programs abcm2ps and your choice of a PostScript viewer. The play button will convert the notation into a midi file using abc2midi and play the midi file. The conversions are not usually error free and may even fail due to the complexity of the notation. You should check the console output (see internals menu button). See samples below.
If you click on one of the blue lines, another window will pop out showing the problem line in the abc notation. Note that the line numbers do not refer to bar numbers but to actual text lines.
The web display button uses Jef Moine's JavaScript code to render and display the music. The abc notated file is embedded into an html file (X.html in the midiexplorer_home folder) which is then displayed using a browser. The html file contains a link to the JavaScript code on Jef's website which then renders to the abc notation in the file. If you click on any note, the script will play the music score and follow along.
Piano Roll View
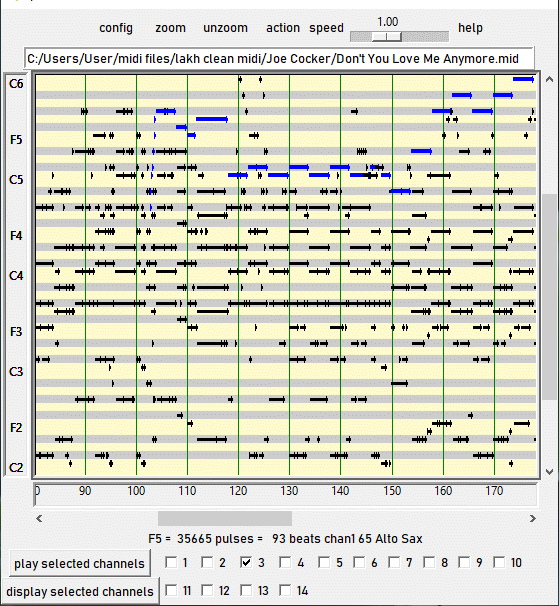
The Piano Roll View displays a piano roll representation of the midi file. Using the scroll and zoom controls, you can select any particular segment of the MIDI file for detailed analysis.
Each note is represented by a black horizontal line, whose vertical position represents its pitch and whose width represents its duration. If you place the mouse pointer on any particular note, a short descriptor of the note is placed in text near the bottom of the window and the checkbutton at the bottom of the screen corresponding to the channel or track is highlighted in red.
You may configure the program to separate the MIDI file by either tracks or channels. A row of checkbuttons corresponding to the channels or tracks appear at the bottom of the window.
The channel/track checkbuttons at the bottom of the window highlight the corresponding channel or track in the the piano roll. You have a choice of two methods for viewing these notes using the config menu button at the top left. In Dynamic highlighting the checkbuttons detect the position of the mouse pointer and display all the notes of the track or channel in red when the pointer hovers over one the corresponding checkbuttons. If that checkbutton is ticked, then these notes are shown in blue. In Static highlighting, the notes corresponding to the ticked checkbuttons are shown in blue and all other notes are invisible. (Note that these highlighted notes may not appear in the particular scrolled region that is visible on your screen.)
The button labeled 'play selected channels' will play the selected channels (or tracks) for the exposed section of the midi file. If no channels are selected, then all channels will be played. The button labeled 'display selected channels' operates in a similar fashion but displays the music in common music notation in a browser that should open automatically. The selected channel (track) buttons apply in a similar manner to the functions listed in the action menu.
You can change the horizontal scale using the zoom and unzoom buttons. For finer control, you can select a particular portion of the MIDI file by sweeping the mouse cursor while holding the left mouse button down. The selected area will be highlighted in a light yellow stipple. (Double clicking anywhere in the piano window will remove the highlighted region.) Next press zoom, to make this area fill the window. The highlighted area will also apply to the play selected channels/tracks button and the functions in the action menu.
While the music is playing, you may see a vertical red marker attempt to follow along with the music. Unfortunately, the music is played by a separate application which does not communicate with this application, so there may be a loss of synchronization between the movement of the cursor and the music. If the moving marker is annoying, you can turn off this feature by removing the tick mark from the config/follow while playing checkbox. Pressing any key on the keyboard while the piano window is in focus will stop the moving cursor for the current instance.
If you are using TiMidity to play the midi file, TiMidity normally ignores the initial rests at the beginning of the midi file. This poses a problem if midiexplorer attempts to follow along with the moving vertical red marker. TiMidity version 2.14 has an option to preserve the initial rest using the option --preserve-silence which you can include in the Options/Player page. (On Linux, I found it necessary to include the option -B2,12 to control the buffering.) The option -ik also provides you with a TiMidity user interface.
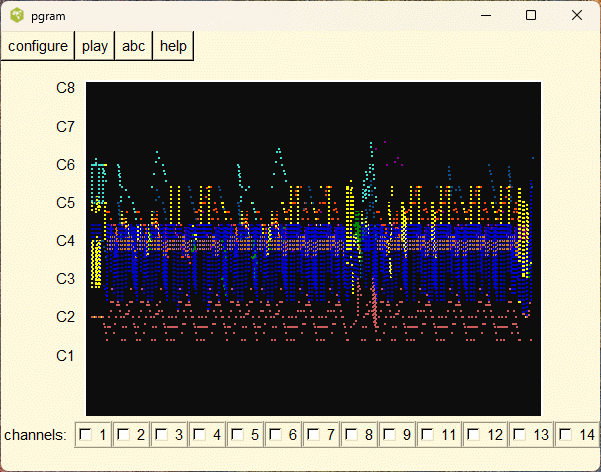
pgram
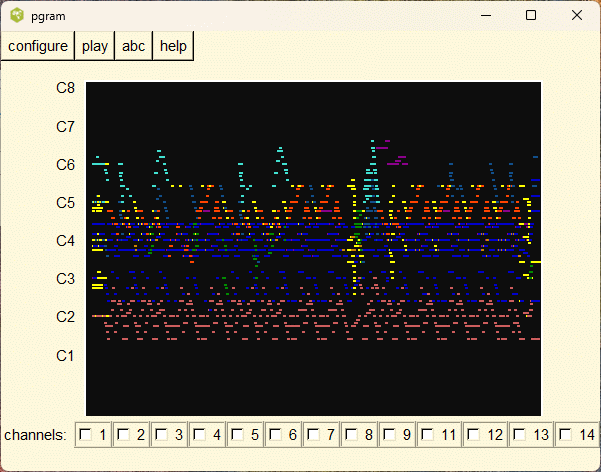
The goal of this plot is to provide a visual representation of the midi file. The plot is similar to the piano roll except that the notes are assigned colors based on the type of instrument (midi program). Thus blue notes are played on a keyboard, yellow notes are played on brass instruments and etc. If you move the mouse pointer on one of the notes, all the other notes belonging to the same channel are highlighted and the channel and midi program are indicated on a status line. Moving the mouse pointer on one of the channel buttons shown below also accomplishes the same result.
Like midi structure and piano roll, pgram also provides a means of generating an abc file of particular channels over a particular time interval in the midi file. Check the midi channels desired, and designate an area by sweeping the mouse pointer while holding the left mouse button down. Then click on the top abc button. A temporary abc file will be created and opened in an editor which will provide other options.
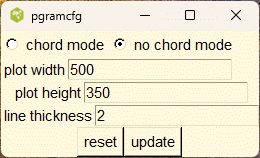
The plot is still experimental and the configuration button allows you to control how the data is presented. There are two modes: no chord mode shows the most detail. In chord mode, the range of notes between the lowest and highest pitches in the chords are displayed by dots along a vertical line.
Tableau

The tableau presents the pitch class maps for each of the midi channels. Since this plot gives an overview of the entire midi file, it is one of the most useful visual representation. If you are not displaying the tableau in compressed mode, it will probably be necessary to horizontally scroll to see the rest of the midi file. Like the midi structure visual representation the tableau gives you access to many of the plots and other functions.
Each of the midi channels except the percussion channel is represented by a horizontal strip. In each of these strips the note onset is plotted as a function of time using the same color scheme as in the midi structure view. The vertical lines separate groups of four beats. The note unset times are plotted at a resolution of one quarter of a quarter note or a sixteenth note. The plot is best viewed on a monitor with a resolution of 1920 by 1080.
It may be hard to see the note onsets when they are displayed in a dark color. For example the piano and other keyboard instruments are represented in dark blue. If the mouse pointer overlays one of those notes, then the color will switch to white as long as the pointer remains over that note.
You can change the thickness and size of the note representation by altering the dot size. Small dot sizes are ideal in seeing all the detail, but if this is too small you can switch to a larger number.
The layout of the note can be switched to the circle of fifths. This may make representation more compact and easier to detect key changes in the music.
The toolbar on the top contains many useful functions which apply to either the visible portion of the midi file, or the highlighted area, and for the selected channels. If no channels are selected by ticking the left checkboxes, then the functions apply to all channels. For example, if you click on plot/pitch class plot, then a window will appear showing a histogram of all the notes visible in the tableau. If you highlight a specific time interval, then the histogram will be updated to reflect only those notes in that interval. If no region was highlighted and you resize or scroll the tableau, the plot will be updated to reflect this change. If you tick one of the channel checkboxes on the left, the pitch class histogram will apply to only the notes in the selected channel. This also applies to the play and abc buttons. The abc button converts the selected section and channels into abc music notation. A separate window will pop up with the notation in an editor. See abc editor in the table of contents in the left frame.
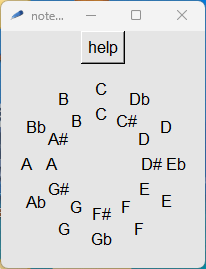
Pitch class map
The pitch class map is similar to the tableau except that the notes are not separated by tracks or channels. This provides more space and it is possible to determine the notes being plotted using legend on the left side. Key changes are easy to see in this representation.
Action Menu
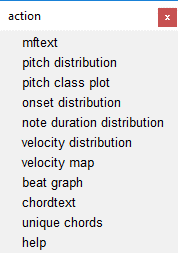
The action menu button brings up a menu of selected actions that you can apply to the displayed region of the MIDI file. Each of the items in the menu will pop up a separate window showing the distribution corresponding to the variable associated with the item. The distribution will apply to only the visible portion of the pianoroll that is displayed. If you have selected a particular channel or track in the checkboxes below, then the distribution will apply only to the checked channels or tracks. If no channels or tracks were checked then the data applying to all the displayed notes is shown. Furthermore as long as these windows are on the screen, the data in the window is dynamic and will change anytime you horizontally scroll the pianoroll data, zoom in, zoom out, or change any of the checked boxes.
Many of these functions can be called directly from the pitch analysis and rhythm analysis menu buttons and are described below.
Pitch Analysis
This menu provides direct access to the various graphs described in the above piano roll action menu without having to go the piano roll. If the piano roll was not displayed the graphs were computed from the entire midi file.Besides the piano roll representation, you can select the tracks or channels of interest in several ways. Tracks or channels can be selected directly from the top level view by clicking on one or more of these entities.
In order to select more than one of these entities, hold the control button on the keyboard down while clicking on one of these items on the screen. To select a group of contiguous entities, use the shift key on your keyboard. If no items are selected, then the analysis is applied on all the tracks ( channels) in the file.
You can also select a specific time interval using either the piano roll or midi structure representation.
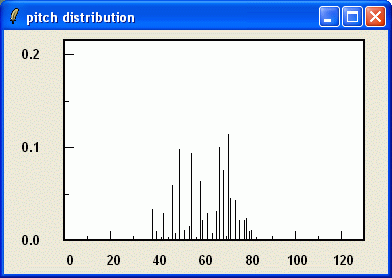
pitch distribution
The plot shows the normalized histogram of the pitches of the selected
notes in midi file.
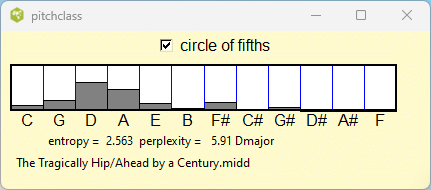
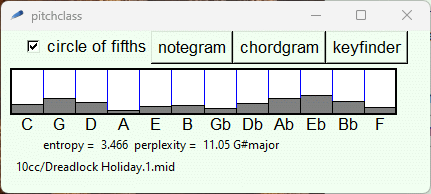
This plot shows the distribution of pitch classes. This is useful for guessing the likely key signature of the music. Many MIDI files do not specify the key signature. By observing which keys are absent and which ones predominate, one can frequently infer the music's key signature.
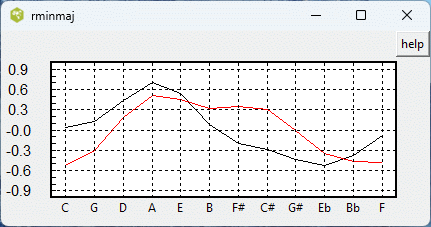
The key D major was estimated by correlating Craig Sapp's pitch class functions for all the possible keys, and searching for a maximum. See Visual Heierarchical Key Analysis. In the above plot, the key of D is most common and the key of F# occurs instead of F occurs. This suggests the key of the exposed section is D major.
The entropy value measures the diversity of the pitch classes. If the music consists entirely of one pitch class, then the entropy would have a value of 0. If all eight pitch classes occurr with equal probability, then the entropy would be 3.0. The perplexity value is obtained by taking 2 to the power of the entropy. Thus if the entropy is 3.0, the perplexity is 2 to the power 3 which is 8.
When you click on the button keyfinder, a plot similar to
below will appear.
The plot shows the correlation coefficient for each
the 12 possible keys. The black curve is for the major
keys and the red curve is for the minor keys.
The scheme does not work well for unusual music scales
such as Dorian mode, blues scale, pentatonic, and etc.
The pitch class distribution is sensitive to the selected channels (tracks) in the main window and midistructure window. It is also sensitive to the selected region in the midistructure window. The current distribution is used by the midi file search algorithm (see database/search).
The algorithm does not work well if the music contains
a key signature change. The following pitch class histogram
does not have any clear maximum.
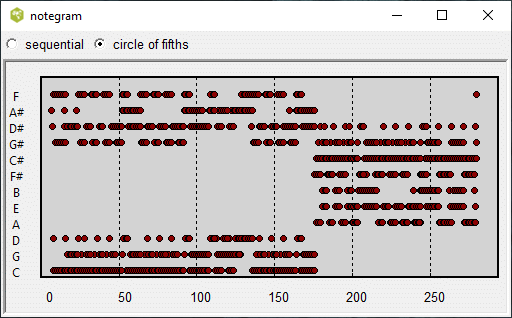
When you click on the notegram button, the following plot
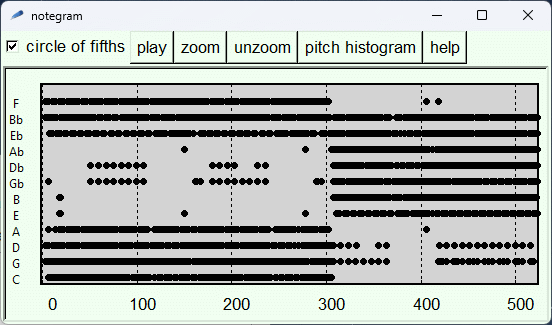
shows a key change from G minor to G# minor after beat 300.
The chordal accompaniment provides the backbone to the melody of alot of the popular music and sets the stage to the nature of the music. In order to identify the chord progression in the composition it is necessary to first identify the chords. If you are not familiar with music theory and how it applies to popular music, the following references https://github.com/vpavlenko/study-music?tab=readme-ov-file> and in particular https://learningmusic.ableton.com/ are highly recommended.
The chordtext function produces a table listing all the note pitches that are played during each beat. The beat number is given in the left most column, followed by the note pitches, and the inferred chord name. Presently, there is one option. If open chord is ticked, then all the pitches are listed irrespective of the octave. Unticking this option, will produce a more compact list, where the octave number is ignored.
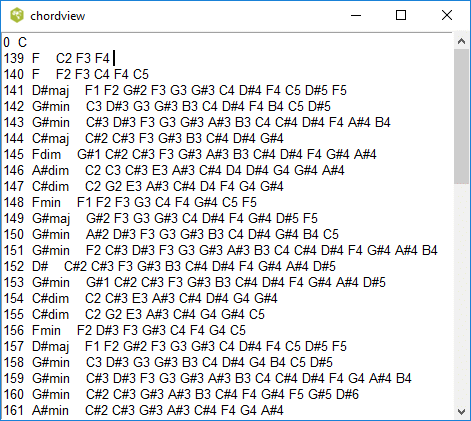
Chordtext can be applied to just selected channels (or tracks), and to a selected segment (if you are calling it from pianoroll). This output is used to produce a chord histogram or a chordgram. The algorithm used to identify the chord name is described here.
Chord identification from midi pitch numbers
This is a long explanation, and it is not necessary for you to understand it unless you will be programming this algorithm on another system. In which case, you can skip this section and still understand how to use midiexplorer.
Craig Sapp's algorithm, does not indicate how to identify the chord type once the root is determined. Furthermore, the algorithm occasionally returns the wrong root for some of the complex chords (7ths and 9ths with inversions). I developed my own method for identifying the chord. Since I did not find any description of the method on the internet, I will describe it here. There are a few preliminaries that you need to know.
The algorithm uses modulo integer operations instead of division. Thus 67 % 12 = 7 is the remainder when dividing 67 by 12. In contrast 67/12 = 5 is the quotient. (In integer division, the remainder is ignored.) Here we will be working with modulo 12. Modulo 12 arithmetic is like dealing with a 12 hour clock. If it is 10 o'clock, three hours later is 1 o'clock. Thus (10 + 3) % 12 = 1.
The second fact you need to know is that all the chord types are defined by the pitch intervals between the notes in the chord. Let the 12 notes in the chromatic scale (C,Db,D,...) map into the numbers 0,1,2,..,11. Then the E minor triad, E,G,B will map into 4,7, and 11. It is a minor triad because the intevals between E and G is 7 - 4 or 3 semitones, and the interval between G and B is 11 - 7 or 4 semitones. Midiexplorer is dealing with 20 chord types, so we need to check these intervals with all the 20 possible chord types. Rather than comparing each of the intervals in the chord, it is computationally more efficient to represent the chord by a code word like 0:3:7 for the minor code. Then we just do string comparisons. Each of the 20 chord types have their own code words. so we need to check these intervals with all the 20 possible chord types.
Rather than spelling out the algorithm here, it is easier to explain it using an example. We will consider the Gmaj/B chord which could be expressed by the notes B2, G3, and D3. The octave numbers are immaterial as long as the lowest note is B. Therefore, B2, G3 and D4 is also the same chord. Our goal is to identify G as the chord root, and to get the code word 0:4:7 which is is associated with a major triad.
The corresponding midi pitch numbers are 47, 50, and 55; so we consider the list (47, 50, 55). We need the pitch of the lowest note 47 or B in order to identify the inversion, if present. In the first step we transform the pitches in the the list to their pitch classes (11, 2, 7) by getting the remainder of each number by dividing by 12. For example, 47 % 12 = 11.
The list is now (11, 2, 7) corresponding to the pitch classes (B, D, G). At this point we do not know whether B, D, or G is the chord root, so we need to get the code word for each note and determine whether it is in our table. To get the code word for a possible root, we add the inverse modulo 12 to each pitch value of the list in order to make the root zero. Thus the inverse of 11 is (12 - 11) % 12 = 1. Adding 1 to each item (11+1,2+1,7+1) % 12 we get (0,3,8) and the code word 0:3:8. This code word does not correspond to any chord type, so we can rule out this note 11 or B, as the root.
We now consider 2 or (D) as a root and add (12 - 2) % 12 = 10, to every element in our list. (11+10,2+10,7+10) % 12 yielding (9,0,5). We can sort the items in ascending order producing (0,5,9) since the order of the notes in the chord is irrelevant. The code word 0:5:9 does not exist in our table, so we can rule out 2 or D as our root.
Finally we consider 7 or (G). The inverse (12 - 7) % 12 = 5. We add 5 to each element (11+5, 2+5, 7+5) % 12 producing (4, 7, 0). We sort the numbers in ascending order to get (0, 4, 7) and the code word 0:4:7. The code word corresponds to the major triad. Therefore G is the root and the chord is Gmaj. Since the lowest pitch B is not the root G, this chord is an inversion and the correct identification is Gmaj/B.
The algorithm occasionally does not return a unique result. The pitches in the augmented chord are equally spaced, and the same is true for the diminished7 chord. As a result, any note in the augmented or diminished7 chords can be taken as the root. Similarly the chords Bb7 and D6 both have the same notes. Contextual information is necessary to choose the right chord name.
Here is the translation table from the chord code to its name.
| 0:1:3:6:9 | dim9 | 0:2:3:7:10 | m9 | 0:2:4:7:10 | 9 |
| 0:2:4:7:11 | maj9 | 0:2:7:10 | 7sus9 | 0:3:5 | sus4 |
| 0:3:6 | dim | 0:3:6:10 | m7b5 | 0:3:6:9 | dim7 |
| 0:3:7 | min | 0:3:7:10 | m7 | 0:3:7:9 | m6 |
| 0:4:7 | maj | 0:4:7:10 | 7 | 0:4:7:11 | maj7 |
| 0:4:7:9 | 6 | 0:4:8 | aug | 0:4:8:10 | aug7 |
| 0:5:7 | sus | 0:5:7:10 | 7sus5 | 0:7 | 5 |
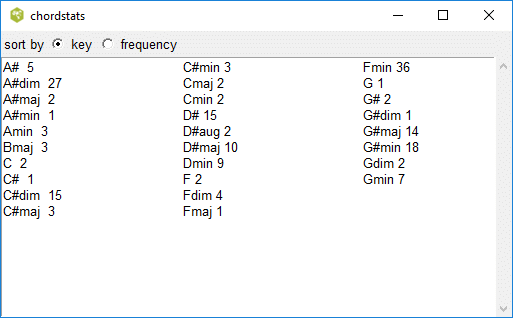
chord histogram
The histogram displays the number of times each of the different
chord types occur in the exposed area of the pianoroll. The chords
can be ordered alphabetically or by decreasing frequency. Detailed
information about the chords can be viewed using the chordtext
function.
chordgram
The chordgram plots the chords as a function of beat number. The chord root is shown in the vertical scale, and different colors are used to distinguish the different chord types. Besides major (red), minor (blue), diminished (green), and augmented there are many other chord types. (The colors are not finalized.) The chord pitches can be ordered sequentially or following the circle of fifths.
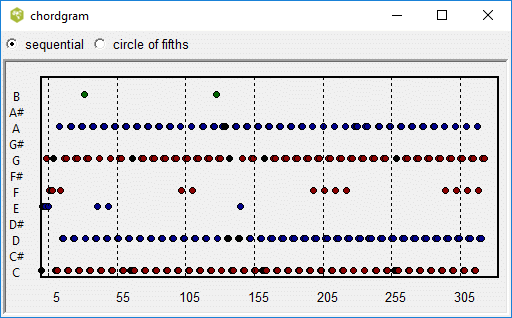
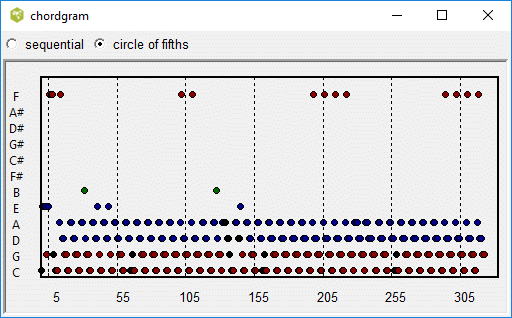
It is a good idea to select the tracks or channels that contain the chordal support or rhythmic chordal support. The melody line contains many nonchordal tones or passing notes which may introduce a lot of complex chords. Acoustic guitar and piano instruments may be ideal for chordal analysis.
It also helps to focus in a region of about 20 to 50 bars using the zoom button.
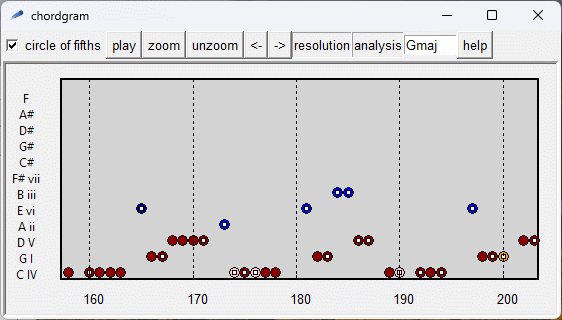
You can use the track info window to select the desired tracks. You can zoom into a selected time interval using the top buttons. The arrow buttons allow you to scroll the zoomed area left or right. Other buttons such as play and analysis link to other functions which apply to only the displayed area.
The labels on the left axis may indicate the roman numeral representation of the chords. This is useful for inferring the chordal progression. (For example ii-V-I is a common progression in Western music.) The key signature is used to determine the roman numeral chord name. In many cases the key signature is not indicated in the midi file and midiexplorer tries to infer the key signature from the note distribution. The key signature that was used is indicated in the entry box besides the help button. In some cases the key signature could change in the middle of the midi file and midiexplorer may be applying the wrong key signature in the displayed region. If you need to know the correct roman numeral names, you should correct the key signature followed by a carriage return in that entry box. This corrected key signature is not saved in the midi file.
As mentioned previously, the program finds all the notes that are playing inside a quarter note beat. These notes may or may not be lined up to form a chord. For example, they may be sixteenth notes played sequentially. For some applications one may prefer to use a time interval larger or smaller than a quarter note. The resolution menu button allows you to change the size of this time interval on a temporary basis. (When you select a different midi file, it will revert back to the quarter note interval.) This can be useful when you are focussing on the bass line.
Notegram
The notegram is like the chordgram except that here pitch classes of all the note playing in each beat are displayed. The notegram is useful in detecting key signature changes. The above plot was determined from a rendition of The Beatles /And I Love Her.
For both the chordgram and the notegram you can select a specific region of interest by sweeping the mouse pointer while depressing the mouse button. This area will also appear in the midistructure window if this window is exposed. This provides a means for playing or analyzing this specific region.
Key Map

This function traces the evolution of the key throughout the midi file. The keys are represented by a strip of colored blocks across the top of the window. The graph below the strip plots the number of sharps (positive) or flats (negative) for each color coded key signature. For most music, there are only minor shifts when the key changes to the dominant, subdominant or relative minor.
Histograms of the pitch classes are computed for each block consisting of n beats where is specified in the spacing entry box. If the pitchWeighting checkbox is ticked, the histogram is weighted by the duration of the notes.
The key is determined by matching the histogram with either the Krumhansl-Kessler (kk) or the Craig Sapp's function (ss), for the different major and minor keys. The key with the highest correlation is determines the color of the block.
If the mouse pointer enters into one of the color coded blocks, the corresponding key will be shown below. Clicking the mouse pointer in one of the blocks, will pop up a normalized histogram in a separate window. The correlation values for the best four keys will be listed on the right column of that window.
The key estimator works better with large blocks consisting of about 20 beats. If specific tracks or channels are selected in either the main window or the midistructure window, they will be used for computing the key strip.
The estimator is useful for detecting key signature shifts in the midi file. Most of the midi files follow a fixed key signature. If the file has a number of key shifts, the keymap may look like
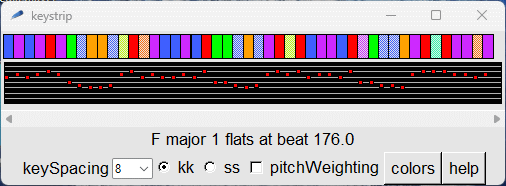
The algorithm was adapted from Craig Sapp's mkeyscape program which is part of the Verovio project and the Humdrum Toolkit. Only two of the numerous key estimator coefficients (Krumhansl-Kessler and simple ) were implemented here. Normally, key estimation is a difficult problem since besides major and minor modes there are other modes such as Dorian, Phrygian, ... as well as pentatonic keys.
Entropy Analysis
An explanation of this analysis appears twice in this document; once here and again under the heading Pitch Classes of Notes. One of these days I might get around to clean up this file.
Music has a lot of repetition -- for example the hip-hop song Black Rob/Whoa.mp3. The goal of this analysis is to measure the degree of repetition at various temporal resolutions. Combining all the nonpercussion notes in all channels and tracks, the analysis returns the number of distinct notes or chords every 1/16 time unit (tatum), the number of distinct beat formed by combining the above tatums, and the number of distinct bars formed by combining the above beats. There is another option to do this on a channel by channel basis described below.
The algorithm used here makes many assumptions to reduce its complexity. The number of beats in a bar is fixed. Each beat is assumed to be a 1/4 note in length. The notes in the mid are quantized.
The chordal and rhythm analysis are separated in this study. The chordal analysis is more detailed in the sense that a bar is separated into smaller units. A bar consists of several beats. Each beat consists of 4 equal and smalller units consisting of 1/16 note intervals referred to as tatums for convenience. All the pitch classes in the tatum are listed in a string representation. The rhythm analysis on the other hand deals with bars only.
It was necessary to make various tradeoffs in performing this analysis. In many cases the onset times are not quantized into exactly causing a certain amount of jitter. For this reason, the rhythm analysis always splits the bar into 24 positions, irrespective of the time signature. In most cases this was sufficient to distinguish the rhythms of most bars. 24 is divisible by 3 allowing for eigth note triplets. On the other hand the tatum division used in the chordal analysis does not fit triplets evenly.
We shall describe the entropy analysis algorithm on a small midi file
shown here.

When you click the menu item entropy analysis a strip similar to
below appears at the bottom of the window frame.

The menu beats/bar allows you to select the number of beats in a
bar. There are two parts to the entropy strip: one for the pitch class
and the other for just the rhythm. We shall deal with the former here.
The analysis is done at three different temporal resolutions corresponding
to the three buttons labeled 14, 19, and 8. The leftmost button
labeled 14 in this example, deals with the finest resolution (1/4 of
a beat or a 1/16 unit). (Triplets are not dealt exactly.) When you
click on the leftmost button labeled 14, the following information
window appears.
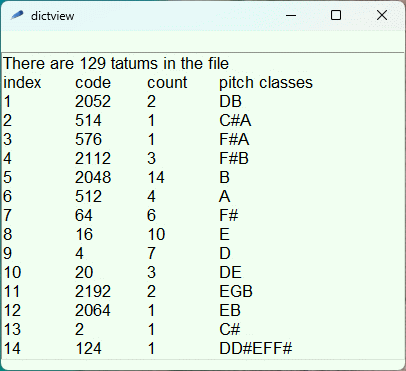
The first 4 indices under the index column deal with the 4 divisions
of the first beat. In order to handle chords, the active pitch classes are
indicated in the 12-bit numbers under the column code. The pitch
classes in the first division are D and B. The active notes D and B
are represented by the numbers 4 and 2048 which are added together to
form the code 2052. This code appears twice in this midi file, so
it is given a count value of 2. Other codes representing the B pitch
appears 14 times. The last column pitch classes interprets the
code for those not conversant with binary numbers.
Clicking on the next button labeled 19 displays the following window,
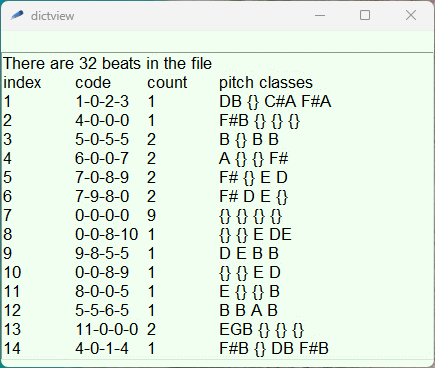
which is now at a resolution of beats or quarter notes. The numbers
under the column code, now reference the indices in the previous
window. Some of these codes also appear several times in the midi
file.
Clicking the map button shows the distribution of distinct bars
for the entire midi file. In each bar unit, the pitch classes of all
the notes in all the midi channels are combined. The distinct bars
are assigned alphanumerical characters. If we run out of latin characters,
we then use greek characters. A repeated character means that the
bars contain identical contents. This map indicates the degree of
repetition and where it occurs in the midi file. You can get
further details on any distinct bar by clicking on one of the
characters. A cursor is placed after the character and the notes in
the bar are shown on the top line. In the following illustrations,
the entropy analysis was applied to a different and more typical
midi file.
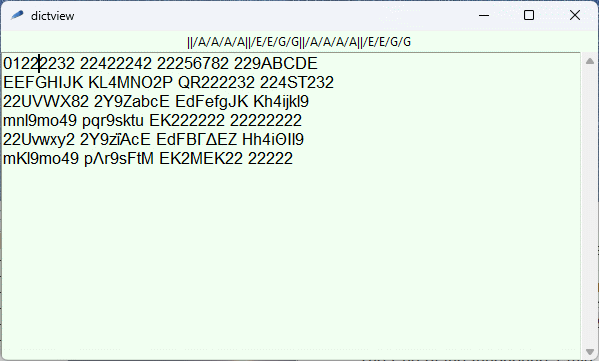
The map all option does the same thing, except that the
analysis is done on a midi channel by channel process. The i/j/k
numbers indicate the number of distinct tatums, beats, and bars
that were detected for the channel. The distinct beats are
encoded by alphanumeric characters as discussed above.
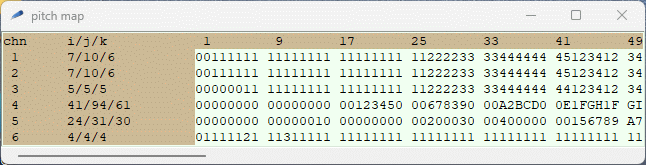
Pitch Classes of Notes
We will start first with the pitch class representation. Only the onset times of the notes are considered. Their durations are ignored. The notes are described by their pitch class rather than their absolute pitch. These assumptions are usually adequate to distinguish all the bars in most of the midi files.
More than one note (or chord) can be turned on in any one tatum time interval. The pitch classes of these notes are collected into a string which is used to describe the status of the tatum. If no note was turned on in this tatum, the string will be empty. Beats and bars are built up in a hierarchical structure by concatenating these strings. The distinct strings are identified, given a numerical index number, and counted to generate histograms for the different time units (tatums, beats and bars). Since each of these time units can have their own distributions, they are presented separately.
When you click on the menu item entropy analysis, a thin frame is added to the bottom of the main window containing various buttons and labels. Here is a sample output derived from blink-182/Dumpweed.mid midi file. The output consists of a sequence of buttons and labels on a single line shown below. The menu button beats/bar allows you to specify the number of beats in a bar which effects the analysis. By default it is set to 4. The three buttons following the pitch class label specify the number of distinct pitch tatums, beats and measures. This is a short and simple midi file consisting of 17 measures, 68 beats, or 272 tatums and containing a lot of repetition.

If you click on the button labeled 13, indicating that 13 distinct tatums were identified then the following window will appear.
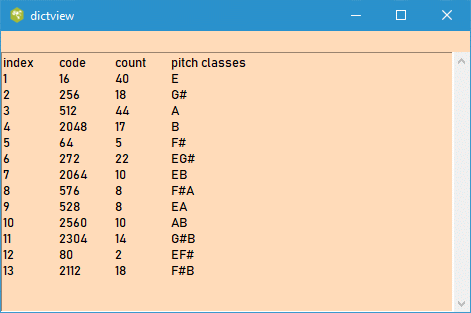
Each of the distinct tatums is given a unique index number shown on the left. The first tatum 'E' is represented by a single on bit in column 4 of 12 bit number. Its decimal value is 16 and it appears 40 times in the file. Clicking on the button labeled 28, indicating 28 unique beats will display the following window.
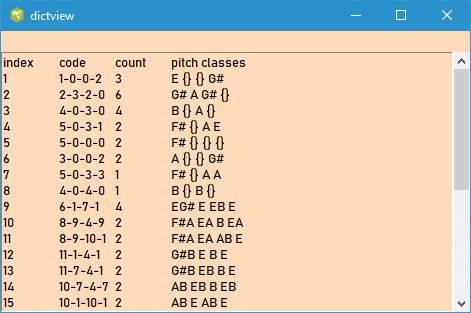
Each of the distinct beats is given a unique index number. The beat is composed of 4 tatums given in the next column, where the tatums are referenced by the index numbers defined in the previous image. The number of times that distinct beat occurs is listed below the column labeled count. The last column spells out the 4 tatums composing the beat. Clicking on the button labeled 10 will display the next window.
All the distinct bars consisting of 4 beats are listed, with their composition and their number of occurrences. Their compositions is indicated by a series of 4 numbers, corresponding to the beat indices in the previous image.
The map menu button provides you with choice of either map or map all. The map button presents you with the sequence of bar index numbers. Here the bars with indices 4 and 5 are repeated.
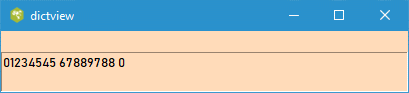
This representation has another useful feature. If you place a cursor in front of a particular bar index using the mouse pointer, and then click the mouse, then the contents of the bar will be spelled out in the header as shown in the following image.
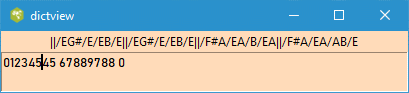
This midi file is split into 5 channels (ignoring the percussion channel).
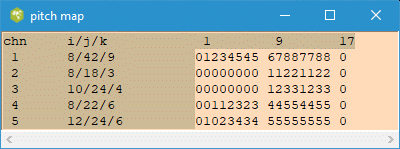
Unlike the previous map which is produced from a composit of all channels or tracks in the midi file, this map separates the statistics for each channel. The numbers under the column labeled i/j/k are the number of distinct tatums, beats, and bars. Thus channel 1 has 9 distinct bars, channel 2 has only 3 bars and etc. The indices of these unique bars are shown in the adjoining map. The header indicates the measure number in steps of 8.
Rhythm Analysis
The onset times of all notes in a bar are quantized into 24 time units. These onset times are listed in sequential order in a string (separated by a colin :), ignoring multiple notes with the same onset time. Thus a string can be empty, if no notes occurred in the bar or can be a long list if the bar consisted of many notes. These strings represent the rhythm in the bar. The distinct strings are indexed and counted forming another histogram. The other map button shows the distribution of these distinct strings (indexed by alphanumeric characters) in the music.To illustrate consider part of the score shown below starting from measure 9.

The rhythm map is shown here.
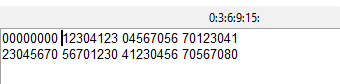
Note that no notes are onset in measure 12, so it is mapped into character 0. The measures 9,10 and 11 are repeated in measures 14,15 and 16 and are represented by symbols 1,2 and 3 in the map.
Map All
You can view the map of the distinct bars for any track or channel by selecting the track or channel in the main window. If the map is already displayed, it will be updated automatically when you select the item, or choose a different midi file. Similarly the information in the bottom strip will also be updated. It is useful to be see the repetitive structure of each of the tracks (or channels) in one frame. If you select map all in either the pitch or rhythm under the map menu, such a map will be displayed as shown below.
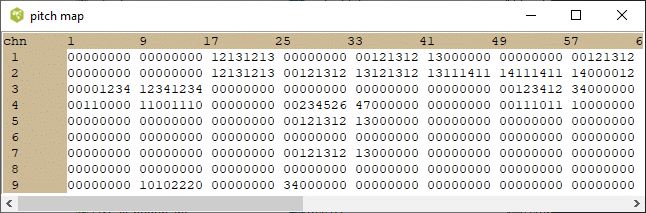
The map of each track (or channel) is shown on an individual line.
Each character represents a distinct bar in the music. The characters
(bars) are displayed in groups of 8 since most musical phrases form
eight bar groups. The same symbol in different tracks maps into
its own distinct bar belonging to that track. Thus the bar belonging
to symbol A in track 2 is different from the bar in track 3. If
only a few symbols are used, this implies that music in that track
is very repetitive. The symbol 0 implies that the bar is basically
empty. (No note onset occurs inside this bar.)
Rhythm Analysis
onset distribution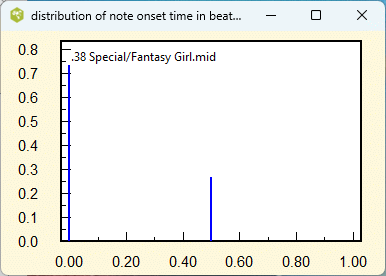
This plot shows the normalized histogram of the note onset time inside a midi beat. To do this, the onset time of each note relative to a quarter note beat is computed. The histogram of these onset times is determined, normalized and ploted. The onset times in many midi files are quantized so that they line up with the beats. If the midi file consists of only quarter and eighth notes, it would look like the above plot.
The onset time histogram for a midi file whose note onset times have not been quantized is shown below. The note onset times do not align with quarter note intervals. These midi files are produced by a performer playing a midi instrument such as an electronic keyboard or guitar.
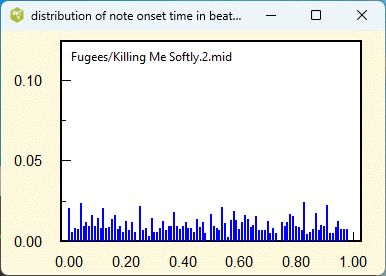
offset distribution This plot is similar to the above onset distribution except that it is based on the note off times instead of the note on times. I am not too sure of its value, but it provides some insight on the nature of the midi file.
note duration distribution
This plot shows the normalized histogram of the note durations in
beat units. Thus a half note would occupy two beats. All notes
longer than 2 and 2/3 beats are grouped together in this plot.

Humans playing midi instruments do not play the notes in exact
musical durations, thus introducing a bit of jitter.
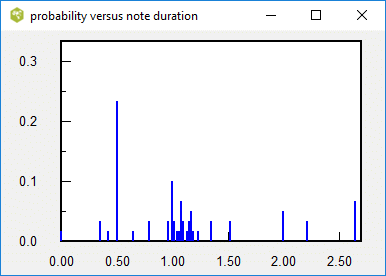
velocity distribution
If you select action/velocity distribution, the program will
analyze the velocity (loudness) indications in the MIDI file
and display a normalized histogram (probability function) of the
velocities of the notes.
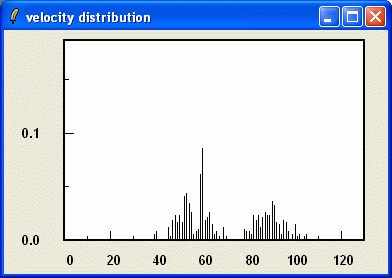
The distribution provides some indication of how the MIDI
file was created. If the velocities cover a wide range,
the MIDI file was probably produced humanly using a MIDI instrument
with velocity sensors. If all the notes are restricted to
a few velocity values, then the MIDI file was probably created
using a music notation program. An example is shown below.
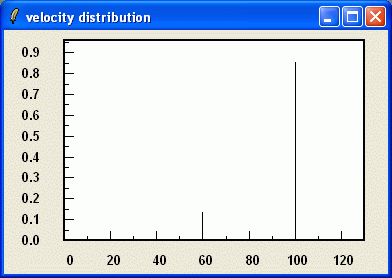
velocity map
If you select action/velocity map, the program will display
the velocity of the notes versus beat number in the horizontally
scrolled area of the piano roll. Each note is represented by a
short line (depending on the note's duration), where its
elevation (in midi velocity units) corresponds to its velocity.
For many midi files, the velocities of the notes remain fixed
all the time for a specific channel or track.
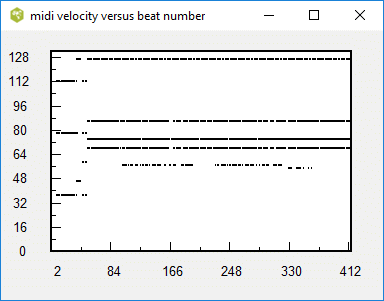
The velocity map for midi files that were created by a human
performance can show more variability, as shown here.
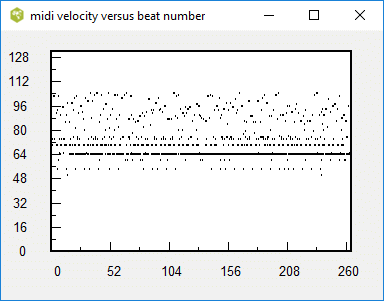
If you select a specific channel and zoom into a small time interval,
in the midistructure window or piano roll window,
you see the details of the human expression.
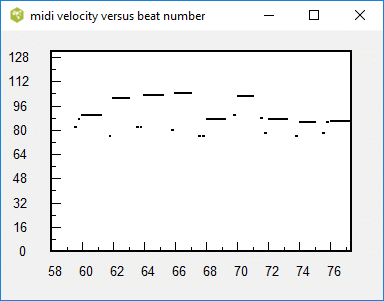
The YouTube video
demonstrates this function.
For viewing the velocity map of the percussion channel/track, it is recommended that you invoke the map from the drumroll window and then click on the plots/velocity map. You will then have the option to select a particular percussion instrument and to zoom into a specific time interval.
beat graph
The beat graph is a useful but complicated representation to describe.
It plots the position of the onset time of a note in a beat versus
its beat number for all the selected notes. If you look at the mftext
output displayed by runabc, note onset times are represented by beat
number, where a beat is usually a quarter note. This is more informative
than displaying the MIDI pulse number. The relationship between MIDI
pulses and quarter notes is given by the PPQN parameter (pulses per
quarter note) which appears in the header of the MIDI file. If the
MIDI file was produced by a music notation program, the onset times
of the notes follow musical standards at occur at exact fractions
of a beat. So the beat numbers of a note are generally numbers like
10.250, 12.000, 13.500, etc. rather than 10.158, 12.012, 13.683, etc.
The beat graph plots the fraction of a beat versus the beat number,
so for previous onset times the points (10, 0.250), (12, 0.000) and
(13.0 0.500) would be plotted. The following plot is an example
of a beat graph for a MIDI file produced by a music notation program.
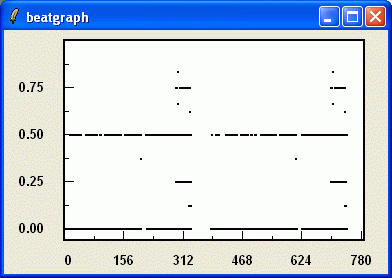
The points generally align along horizontal lines. If there
are no notes smaller than a quarter note, then the horizontal line
will be along the zero axis.
Creating a MIDI file using a music notation program is very time-consuming.
MIDI files are also created in real time while the musician is
playing a MIDI keyboard. Often the musician plays the music a little
fast or a little slow, so that all the beats are a little shorter
or longer than the nominal value indicated by the PPQN. The
following figure shows the beat graph for such a file.
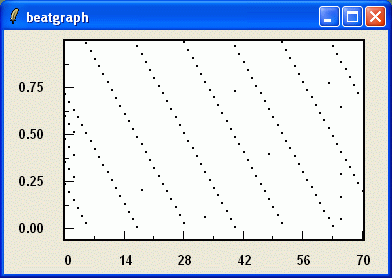 Since the beat positions seem to occur earlier in each subsequent
frames (the points are sloping downwards), it appears that the nominal
PPQN is a bit too large. If midi2abc produced a abc file using
the value in the MIDI file, there will be lots of tied notes.
(In this case, midi2abc should estimate the unit length by minimizing
the quantization error and you will probably have to introduce an
anacrusis value.)
Since the beat positions seem to occur earlier in each subsequent
frames (the points are sloping downwards), it appears that the nominal
PPQN is a bit too large. If midi2abc produced a abc file using
the value in the MIDI file, there will be lots of tied notes.
(In this case, midi2abc should estimate the unit length by minimizing
the quantization error and you will probably have to introduce an
anacrusis value.)
You may also see a beat graph which looks like this.
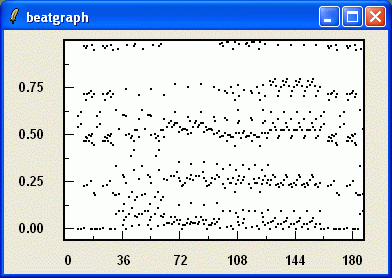
The PPQN is probably correct, but the notes have not been quantized to musical intervals. The midi2abc output may need considerable editing.
The beat graph is not my original idea, but was first introduced by Van Belle Werner (http://bio6.itek.norut.no/werner/Papers/bpm04/) which I adapted it for a MIDI file.
Like the velocity map window, you can indirectly zoom into an area or select a particular channel or track using either the midistructure or piano roll windows.
After Touch
Beside note/on and note/off commands, the MIDI file contains many messages which affect the audio quality of the notes produced by the synthesizer. These effects range from subtle, to obvious. The program refers to these messages by after touch. Here are the messages that are recognized by this program.
- pitch bends
- pressure
- expression
- modulation wheel
- volume
- hold pedal
- control change
The after touch commands, which typically appear in clusters, apply to a specific midi channel. Clicking on the menu item view/aftertouch will display a new window called effect as shown below.
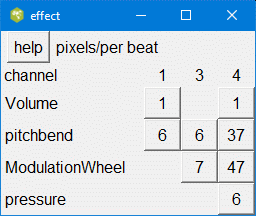
The window contains a rectangular array of buttons, where the column corresponds to the channel and the row corresponds to the particular effect. The label on the button indicates the number of effect clusters found in that channel. Clicking on one of these buttons will cause a window called touchplot to pop up. The window will expose a portion of a plot showing the value of the effect (if present) versus the beat number in the MIDI file. For reference, the plot is overlain with a pianoroll representation of the notes in that channel.
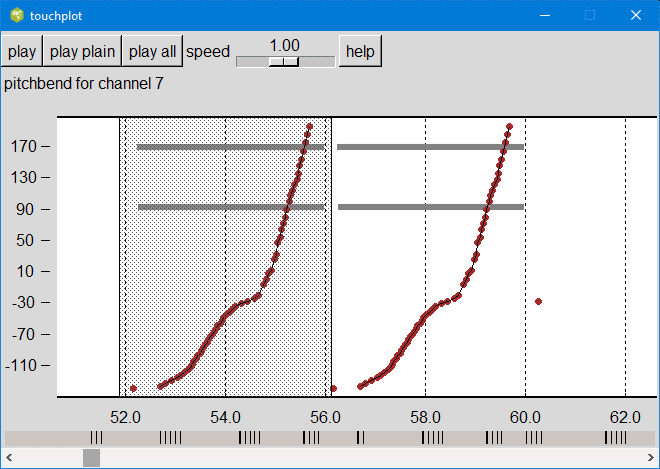
For example, here we are looking at pitch bends for channel 7. The units of vertical scale refer to the values of these effects in the MIDI file. A pitchbend of 128 shifts the pitch of the note upward by two semitones. You can hear the sound of the displayed notes, or selected notes by clicking the play menu button on the top. The selected notes will sound like this. In contrast, clicking play plain button will play the same interval without the effects (pitch bends). The play all will play all channels for that interval and would sound like this for the entire exposed region.
The touchplot exposes a small time interval of the entire MIDI file. You can scroll to any region by shifting the horizontal scroll button at the bottom. The positions of the pitchbend clusters are indicated in the narrow gray strip above the scrollbar. If you shift the scroll button near one of the indicated clusters, the pitchbend cluster should appear.
Caution: the midi file represents notes by their start and end times. When selecting the notes to play, you must include the time just before the notes begins. If your start time is in the middle of a note, that note will be ignored when it is played. You cannot select part of a note.
The modulation wheel control change message has a more subtle effect. In the following plot
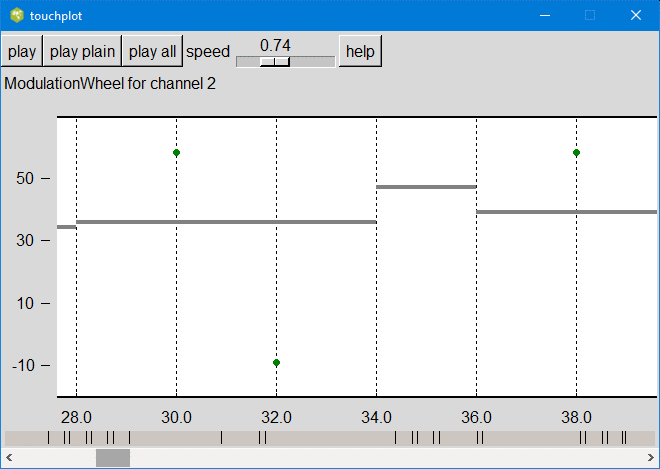
there are three Modulation Wheel control changes displayed (green dots), which occur in the middle of the notes. They affect the degree of the vibrato of the note. This is more obvious when the speed of the playback is reduced. Listen to the following sample.
For all of the after touch effects except Hold Pedal the program plots the value of the effect as a dot where the dots are joined together by connect lines. However, in the case of control change hold pedal messages, they can take only two values -- up or down. The program shades the regions where the hold pedal is depressed. Here is an example:
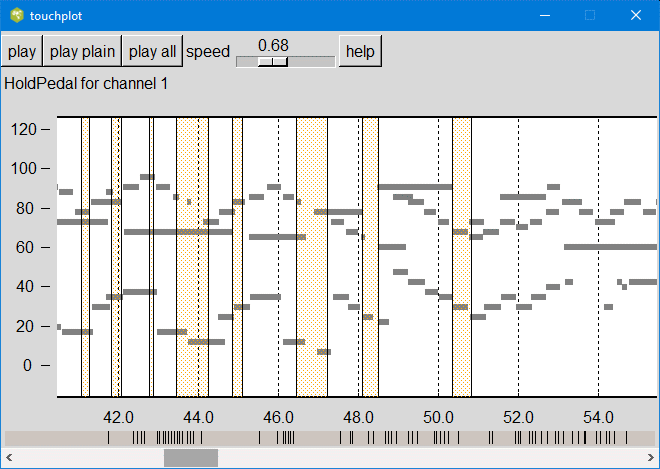
The effect is too subtle for my ears. For example, compare the audio files with hold pedal and without hold pedal.
In case you have trouble finding a Midi file with many aftertouch effects, I have enclosed a sample file in the zip file including the source code (eg midiexplorer.zip).
Percussion
The midi standard reserves channel 9 to percussion instruments. Many midi files utilize this channel to make the music more realistic. The percussion line does not carry a melody, however, it is an ideal track to analyze since it much simpler and has a lot of repetition. A recent addition to midiexplorer is the analysis of drum grooves. A statistical analysis of the percussion data in the Lakh Clean data set can be found here.
Drum Roll View
The percussion instruments play an important role in many Midi files. The MIDI Standard devotes channel 9 for transmitting the percussion information. Since pitch is irrelevant here, the pitch byte in the note events is used for differentiating the 47 percussion instruments specified by the General MIDI Standard. Many of the midi files in the Lakh Midi Database incorporate the percussion instruments as additional backing to the music.
Percussion sequences in MIDI files tend to consist of various loops corresponding to one or more music bars. The nature of these loops may provide some indication of the nature of the music. For example, you can find a free collection of percussion loops in the web site fivepinpress.com grouped by genre. Another useful site is Also see The Best Free Midi Drum Loops....
Midiexplorer devotes several functions designed to explore the the percussion track. The drumroll view is the starting point to accessing these tools.
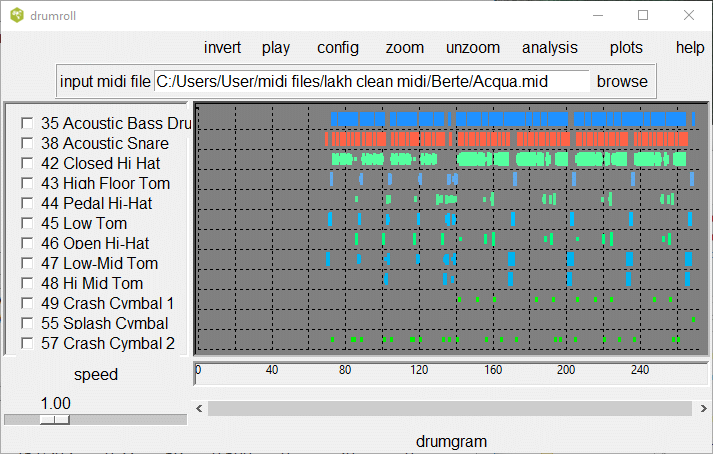
The buttons on the top of the window, allow you to zoom into a time interval, play selected percussion instruments in that time interval, and extract further statistical information. In the next image, we have zoomed into a particular time interval allowing us to see the individual notes.
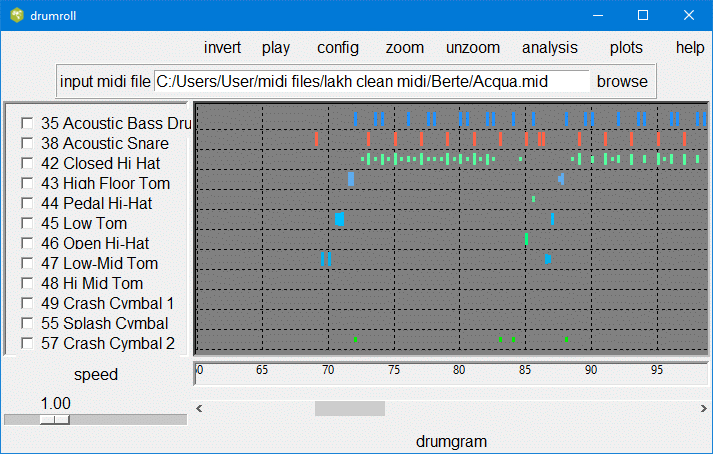
The drum hits are color coded by the type of percussion instrument. Thus bass drum and low tom are bluish, while hi-hats are greenish. The height of each hit is proportional to the MIDI velocity corresponding to that note.
The play button either plays the entire exposed or selected drum sequence or the selected drum instruments indicated by the checkboxes on the left. The config button allows you to determine whether to play the percussion channel by itself or to play the channel with the other channels in the midi file.
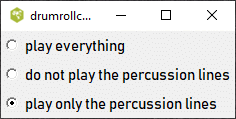
You can select the particular percussion instruments to play by ticking the appropriate checkboxes. The invert button is a convenience for reversing any selections. Thus if you want to play all the percussion instruments except for one, check that instrument and then click on the invert button.
The plot menu button allows you to see the distribution of the drum onsets and velocity in separate graphs. They graphs were explained in the context of the pianoroll action menu.
Percussion Line Analysis
The analysis button displays information on the number of distinct bars, beats, and microbeats or tatums in the percussion line.
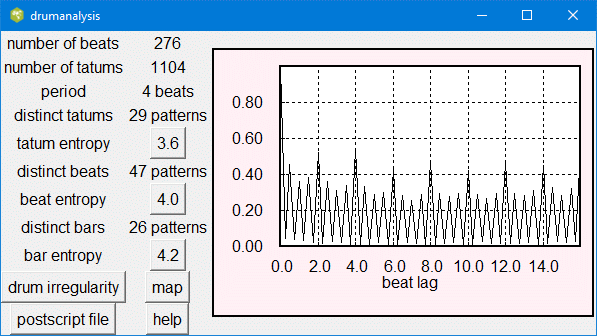
The number of beats specifies the length of this time series that is exposed in the drumroll window. If you have zoomed into a section of the file, the number of beats will be smaller than the total number of beats in the midi file. The number of tatums is always 4 times the number of beats.
The analysis quantizes time into 1/16 note time units which we call a tatum. Therefore, four consecutive tatums form a single quarter note beat. For each tatum, the state of the 47 MIDI percussion instruments is represented by a 47-dimensional binary vector. Internally, this binary vector is encoded by a single binary integer consisting of 47 bits. This representation allows us to apply various binary operations in parallel. Thus the time series of states forms a sequence of integers. The right graph initially shows the autocorrelation of this time series, as explained below.
The autocorrelation is determined by logically comparing this time series with a time-shifted version of the same series. The number of set bits that are common in the two sequences is counted and reported for a specific time shift. The maximum match is obtained when there is no time shift and this value is used to normalize the plotted results. Therefore the autocorrelation is always unity for a time shift of zero. If the sequence is periodic with a period of n tatums, there should be secondary peaks corresponding to n and other multiples of n. The autocorrelation function is plotted versus the time difference between the two sequences. The autocorrelation function is used to measure the periodicity of the sequence. The period is assumed to be at the largest peak other than one at zero. In the above example, the program detected a periodicity of 4 beats (or 16 tatums).
Owing to the nonrandom nature of the percussion time series, many tatum states tend to recur repeatedly. In fact, in this example only 29 tatum distinct states were found out of a total of 1104. Furthermore, only a few of these states occur with any frequency. Each of these states were labeled with an index number and the histogram of all of these states was computed. The degree of variability is expressed by the tatum entropy. An entropy of 1 implies that two states occur on the average. An entropy of 2 implies that four states occur on the average. An entropy of 3 implies that eight states occur on the average and etc. If you click on entropy value, here 3.6, the histogram replaces the autocorrelation function. Note that the vertical axis is a log scale.
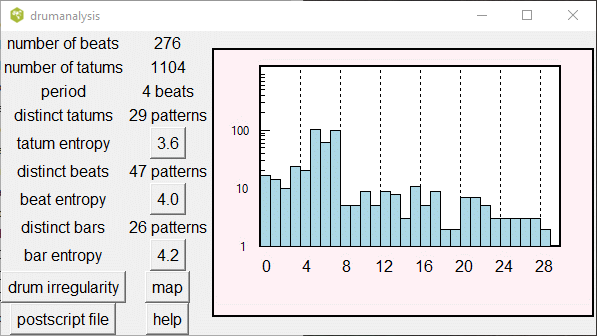
The beats are composed of 4 sequential tatum states. Again the number of distinct beats is not necessarily large. The pattern of beats may be periodic in some parts of the midi file forming loops of 4 consecutive beats, which are referred to as bars. A low bar entropy implies few loops.
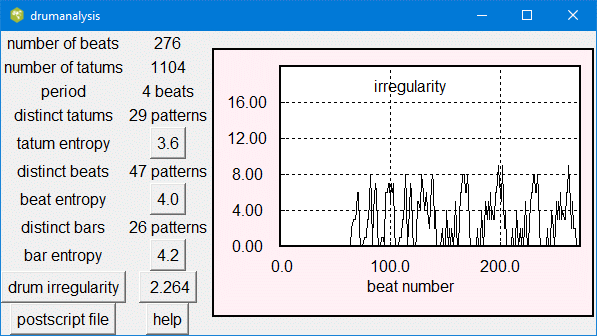
Assuming that the drum pattern is periodic with the specified number of beats, we can predict the next bar based on the previous one. The irregularity is computed from the discrepancy between the predicted and observed beat. The total discrepancy measured over the exposed region of the drumroll window is normalized by the number of beats. This discrepancy is plotted as a function of beat number when you click on the button labeled irregularity.
The map button displays a new window which labels all the distinct bars with an alphanumeric character. This is done for each of the percussion instruments in the Midi file. Note that new character mapping is created for each percussion instrument. The last line maps the distinct bars when all the percussion instruments are combined. It therefore shows the most variability as it is affected by any change in any of the above percussion instruments.
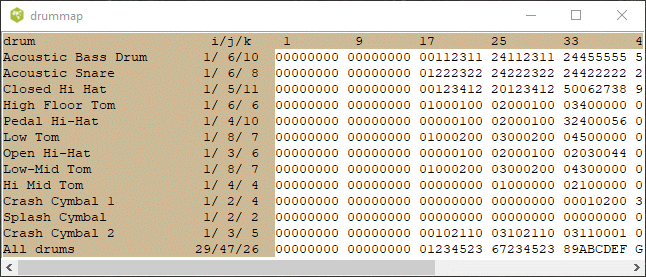
The distinct beats are labeled with numerical indices and bars are formed by concatenating the beat indices. The number of distinct bars can be determined and each distinct bar can be assigned a numerical label. Thus it is possible to track the distinct bars.
The i/j/k numbers indicate the number of distinct tatum, distinct beats, and distinct bars found for the specific percussion line. i is always 1 for each of the individual percussion instruments; however, when all the instruments are combined i is equal to the number of combinations of instruments that occur in the tatum. This number is always less than 2 to the power n where n is the number of percussion instruments. The k value is the number of distinct bars found in the percussion line. The number of distinct character labels is k. Zero, denotes no percussion activity for that bar. The bar number is indicated in the top line.
Drum grooves
A drum groove is a repeating pattern of percussion note onsets played on one or more percussion instruments. This software presently focusses on the pair of bass drum and snare drum which frequently occurs in the drum channel. These two instruments may create a repeating pattern of 4 or more beats which is we call a groove. The symbol also defines the groove, but we ignore it to simplify the algorithm for disassembling the the music into grooves.In order to encode the groove, the onset time of bass drum or the snare drum is quantized into 1/4 beat units or sixteenth notes relative to the beginning of the beat. The beat is then represented by two 4-bit numbers concatenated into a single 8 bit byte, where the first 4-bit number represents the onsets of the snare drum and the second 4-bit number represents the onsets of the bass drum. Thus the binary number 10000010 would denote a snare drum hit at the beginning of the beat and a bass drum in the middle of the beat. Four consecutive beats represented by four consecutive numbers would define a four beat groove. The percussion line in the midi file is broken into 4 beat blocks and their representation is shown for each in a separate line in both binary and hexadecimal format. The first number on the left indicates the beat position which ascends in steps of 4.
The four hexadecimal numbers are separated by a colon ':' forming a string that defines the groove. A dotted line is used to indicate that the groove repeats over consecutive blocks.
The menu item beats/groove allows you to change the size of the groove. The change remains permanently in effect. For grooves larger than 4 beats, the binary representation is omitted to conserve space.

Groove Histogram
The groove histogram indicates how many times each groove appears in the midi file. Usually there are not many distinct grooves except when the note onsets are not quantized or dithered.
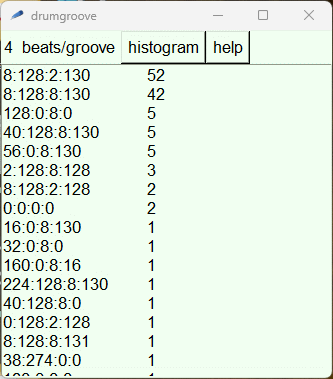
Search Groove
This tool is used to search for particular grooves in a large collection of midi files. You enter the groove code word and then click on the search button. A list of all the files with this groove appears in the table of contents of the main window.
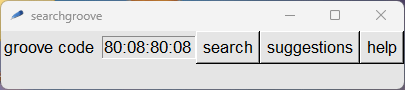
It is difficult to enter the groove code, so you can click on the suggestion button which lists the common groove codes. Clicking on a item in the listbox will transfer the groove code word to the entry box.
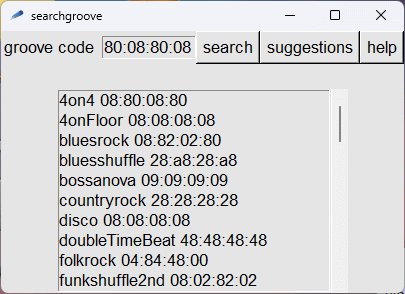
The tool scans a file called grooveFile.txt that should be found in the root folder of the midi collection. If this file is not found, then midiexplorer will scan the collection and create this file. grooveFile.txt is a plain text file that looks like this.
"10,000 Maniacs/A Campfire Song.mid", 80:20:00:00, 00:00:00:00
"101 Strings/Theme From The Godfather.mid", 08:80:08:80
"10cc/Dreadlock Holiday.1.mid", 08:80:90:28, 08:80:00:80, 08:80:40:80
"10cc/Dreadlock Holiday.2.mid", 08:80:00:80, 08:80:08:80
"10cc/Dreadlock Holiday.3.mid", 08:80:90:28, 08:80:00:80, 08:80:40:80
"10cc/Dreadlock Holiday.4.mid", 08:80:40:80, 08:80:00:80
and etc.
Grooves that appear more than 10 times are listed here.
For some of the music which is in 3/4 or 6/8 times, there are 3 beats or a multiple of 3 beats per groove. The algorithm tests for such rhythms and switches to 3 beats per groove. The test consists of comparing the number of distinct grooves for the two different sizes.
Grooves that are 8 beats long appear as two 4 beat grooves which alternate in time. They are easy to recognize.
PercView
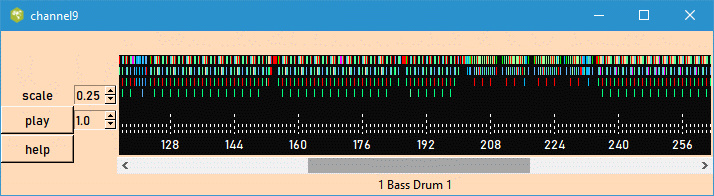 This tool provides another way of visualizing the percussion
channel of the midi file. When the scale factor is set to 0.5
or less, the representation is very compact allowing you
to get an overview of the entire file. Each of the drum events
is represented by a short vertical color coded line segment.
The color separates the different types of percussion instruments.
Thus the blue color is used for the bass drum or floor Tom, the
red color represents the snare drums, hi-hats and cymbals are
green, and etc. The events are exposed to a resolution of 1/4 of
a beat or 1/16 th note. If your mouse cursor enters one of these
line segments, the name of the percussion instrument will appear
in the status line at the bottom of the window.
This tool provides another way of visualizing the percussion
channel of the midi file. When the scale factor is set to 0.5
or less, the representation is very compact allowing you
to get an overview of the entire file. Each of the drum events
is represented by a short vertical color coded line segment.
The color separates the different types of percussion instruments.
Thus the blue color is used for the bass drum or floor Tom, the
red color represents the snare drums, hi-hats and cymbals are
green, and etc. The events are exposed to a resolution of 1/4 of
a beat or 1/16 th note. If your mouse cursor enters one of these
line segments, the name of the percussion instrument will appear
in the status line at the bottom of the window.
When several percussion instrument hits occur at the same time, they are stacked on top of each other.
You can increase or decrease the scale factor using the spinbox at the left. Here is an example of the view with a higher scale factor.
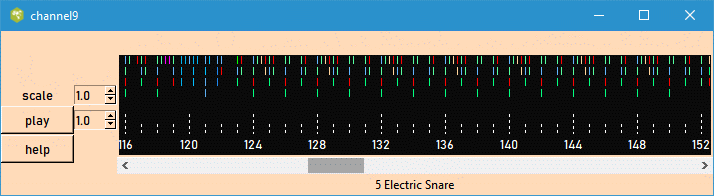
The horizontal scale is midi beat numbers for that file.
If you click the play button on the left, whatever that is exposed in the window will be converted to a midi file and played. You can change the view using the horizontal scroll button and resizing the window. The percussion channel will be played at normal speed when the spinbox value is set to 1.0 and slower when the value is less.
Mftext
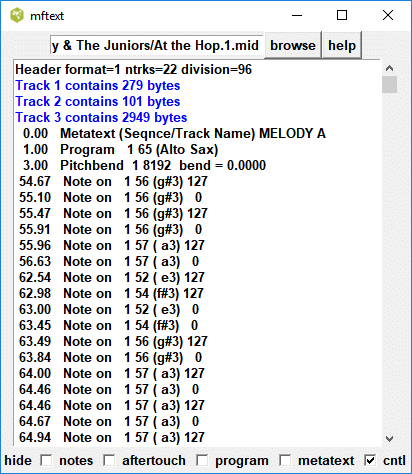
The output is somewhat similar to mftext. Time is indicated in beat units. The channel number is usually indicated after the MIDI command.
The checkbuttons on the bottom allow you to elide specified tracks or specified MIDI commands. For example, in the above sample all the MIDI commands in track 2 were hidden. This is useful when you are viewing a fairly complex MIDI file. When you start this function, all the tracks have been elided. By clicking on one of the tracks, its contents are revealed.
There is presently an unresolved issue with midicopy or some of the midiplayers, whereby the MIDI program command does not change the instrument from the acoustic piano. A hot key cntl-shift-T is used to show the tmp.mid (produced by midicopy) in the mftext window. To restore back to the earlier midi file, press the Enter key while the mouse pointer is in the entry box indicating the midi file name.
Database
Create Database
This application, under the database menu, analyzes all the midi files that are found inside the root directory and creates a text file called MidiDescriptors.txt which is stored in the same root directory. The file contains a description of all the midi files that were found and is used by the search function described next. The program reads every single midi file in the directory, so please allow some time. On the Linux operating system, a collection of 17,000 midi files is analyzed in about 2 minutes. On the Windows operating system, this can take twenty minutes. It was determined that the antivirus program was hogging all the computer time. (Each time an executable or file is opened, the antivirus checks this file. Since this is done repeatedly, the antivirus program slows the process considerably.)As this program develops, there may be changes to the content of this file, so it may be necessary to regenerate this database with a newer version number.
Some of the midi files may be found to be defective in some way. They will be marked defective in the database. You can get a list of those files by selecting the defective files in the database menu. A brief description of the defect will be given when you click on any files in that list. You may still open these files but some programs will refuse to play those files.
Unfortunately, though every effort was made to make midi2abc robust, there may be a midi file which causes midi2abc to crash and causes this program to stop analyzing the remaining midi files. If this occurs, you can look at the MidiDescriptor.txt file and determine which was the last file that was processed before the crash.
Search
Given the above database, this function permits you to select the midi files that have the characteristics you indicate in the window that pops up. For example, you can select all the midi files whose initial tempo exceeds a certain value and contains a certain set of midi programs.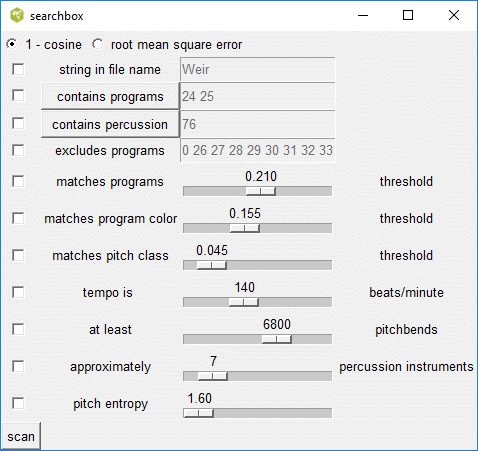
Only the statements that have a tick in the checkbox are active in the search.
As a convenience, you specify the required program numbers by clicking on the button labeled 'contains programs' and checking the boxes in the popup table. Only the midi files containing all of the selected programs will appear when you perform a scan. I have yet to implement a similar method for the excluded programs, so you will have to enter their numbers in the associated entry box.
The minimum number of percussion instruments in the midi file can be specified on another line.
There are two methods for matching the distribution of programs in the midi file. The first method match programs attempts to match the programs in the fine scale. The second method match program colors matches groups of programs, but was found to be somewhat inferior in finding files with similar styles.
The program color displayed in the 'midi structure' window has been stored in the MidiDescriptor.txt file for each valid midi file. You can attempt to find all the midi files which match this program color vector if you tick the appropriate checkbutton. Depending on whether you select 1-cosine or mean square error, the matching criterion is based either on correlation between the search vector (shown in the 'midi structure' window) and the vectors in the MidiDescriptor.txt database or on the root mean square error between the two mentioned vectors. For the 1-cosine criterion, the difference between 1 and the correlation is returned and is compared with the specified threshold. It is suggested that you set the matching threshold to some value like 0.95. If you get too many matches, raise the value. If you do not get any matches, you will have to lower this threshold. To keep processing time down, the number of matches found is limited to 200. The matching of the pitch classes is performed in a similar manner.
Provided you match either the program color or pitch classes but not both, the degree of matching error will be shown under the 'criterion' column. A histogram of the matching error will also pop up.
The function first counts the number of files that satisfy these conditions. If more than 50 files were found, then only a random selection of these files is listed in the top window in black letters and replaces the tree structure. (You can get a different selection by repeating the scan.) You can click on any of these files to gain more information. If you like the music in one of the listed files, you may wish to explore the other files that are in the same folder.
There are two important features. First the file used for matching, always appears in purple in the list. This allows you to go back to perform another search. Secondly, as a convenience, you can right click on the file and the other files in the same folder will be inserted in the list and displayed in green.
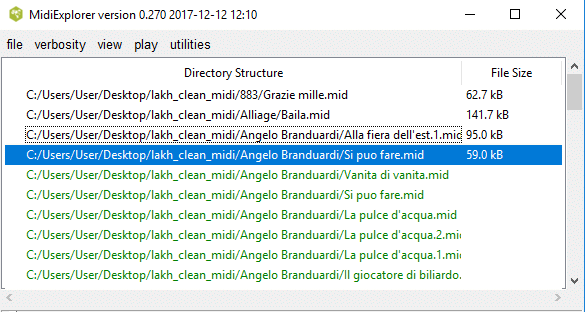
The pitch class entropy is a particularly interesting variable. It measures the information in the pitch class distribution. Here is an example of a midi file with a high entropy. The distribution implies either that the music uses a chromatic scale or that it has many scale changes.
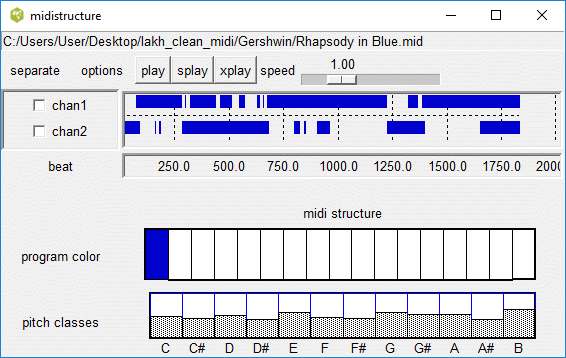
The other example is a tune with a low entropy.
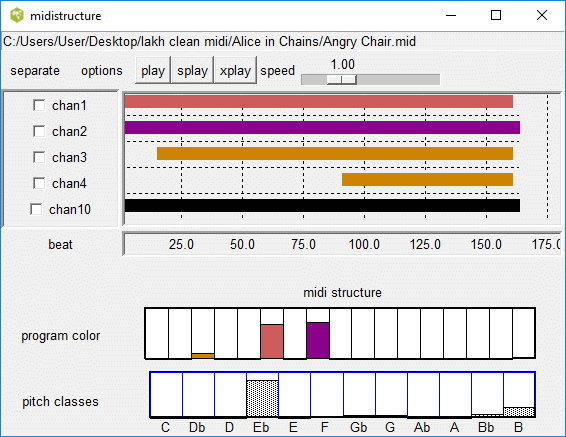
Export
Midiexplorer cannot attempt to include all the data and statistical analysis techniques that can be found in separate software packages. Many of these packages are free, such as R, Scipy (in Python) and Weka (in Java). The export menu button allows you to save the information in the database into a form that is easy to import into these packages.
All the data is saved in the same form in a text file with a csv extension with the exception of info.data. Each line in the csv file represents a single midi file. The midi file that is referenced is given by the index number in the first column and matches the value in the database. Variables are separated by commas. The csv files are written in the same folder in which the database contained in MidiDescriptors.txt is stored. Here is a description of these files.
info data creates a file called info.tsv. (It was necessary to use tabs as a separator, since commas existed in some of the file names.) Each row of the file lists the index number, the number of beats, the tempo, the number of pitchbends, the entropy of the pitch class distribution, the number of percussion instruments used, and the path to the midi file. This is the only file which provides the midi file name corresponding to the index.
file index creates a file called fileindex.tsv. The purpose of this file is to list the full path to all the midi files and to relate these midi files to the index numbers used in the other exported files. This file is useful when you are creating your own program to extract particular midi features.
progcolor data creates a file called progcolor.csv. Each row of the file lists the index number and the 17-dimensional vector representing the program color that is visible in the midi structure view. Recall that the midi programs or instruments are grouped into 17 categories, such as piano instruments, string ensembles, choir, etc. The activity in this category is based on the total time that the notes are playing for the instruments in that category.
key stability creates a file called keystability.csv.
The function requires midistats version 1.02 or higher and
fileindex.tsv in the root folder of the midi database.
The function estimates the stability of the key signature
in the midi file. In some midi files, the key signature may
shift to another key without issueing a key signature message.
This may be apparent in the keymap view for that midi
file. Like in keymap, Craig Sapp's algorithm is used to
estimate the key for each 2 bar segment (8 beats) in the midi
file. The key value is represented by the number of sharps
(positive number) or flats (negative number) needed to represent
the key signature. The midistats program is executed on the
file with the option -keystability. The output looks like this.
2 2 2 2 2 1 1 2 2 2 2 1 1 2 2 2 2 2 2 2 1 2 2 1
entropy = 0.8112781244591328
The value of 2 indicates 2 sharps which commonly occurs
in the key of D major or B minor. Midistats computes the
entropy of this distribution. Midiexplorer converts the
entropy value to the perplexity by taking 2 to the power
of the entropy. Midiexplorer records the file sequence number
and the perplexity value (separated by tabs) in the output
file keystability.csv.
Most of the midi files have a key perplexity of 1 or 2, indicating that the key remains fixed. A small number of files have larger perplexities above 4 indicating that key was shifting. For example, that midi file could be a medley of several songs.
drum data creates a file called drum.csv. There are 47 percussion instruments defined by the General Midi Standard. Each line contains a file index number and a 47- dimensional binary vector. The absence or presence of the percussion instrument is represented by a zero or one for each of the 47 possible percussion instruments.
drum hits data creates a file called drumhits.csv. This is similar to the drum.csv file except that the number of times that the percussion instrument was hit is indicated.
pitch data creates a file called pitches.csv. The file contains the activity for the 11 pitch classes.
bad midi files creates a file called badfiles.txt with a list of all the defective midi files. You can create a script to move or delete those files.
A sample study can be found on the web page R studies.
Indexed file
This feature allows direct access to the midi file that was indexed in the MidiDescriptors database and the various exported files. If you are using various external packages to analyze the statistical properties of the database, it may come in handy to be able to go to a particular midi file with a particular index number. The function pops up a small window, where you can enter the index number in the entry box. Clicking the select button or hitting the Return key will cause midiexplorer to jump to the midi file with that index number.
notebook
This is an advanced feature for updating the melody.txt file that is found in the lakh_playlist folder with the midexplorer source code. The information in the lakh_playlist is described in this document under the heading Playlist Manager. The melody.txt was created to collect information regarding which channels in the midi file carry the melody line. Clicking the notebook button or more efficiently the key stroke cntrl-n, will pop up a window allowing you to append text to the melody.txt file. I am still manually building up the information in this text file. Eventually, I will create an application which will automatically determine, where the melody line is found (it could move around different channels) and record this in a database. The melody line contains the key information in recognizing the music.
genre database
This is an advanced feature for updating the genre.tsv file that is also found in the lakh_playlist folder. This tab separated text file, contains a table relating the lakh clean file name with the music genre. This is also work in progress. Clicking this menu button will pop up a window allowing you to enter the genre associated with this file.
Most of the files have a 0 entry which is just used as a place holder. The genre entry was determined by doing a google search on the artist and title of the music, using the cntrl-g key stroke or the view/google genre menu button. This is quite laborious, so it will take a long time to collect the information without help.
The genre association is quite rough. In many cases, Google returns several possibilities. Most of the files are considered as Pop or Pop rock. Midiexplorer now displays the music genre (if it has it) after the music title in the info block.
Easter Eggs
If press the <alt> -p key while the focus is on the midistructure window, the program will create postscript files progcolors.ps and pitchclasses.ps in your current folder.Data Plots
Distributions of various variables covering the entire midi file database can be viewed here. For example, the tempo distribution shows the percent (probability) of the files whose tempo is set below a specific value.
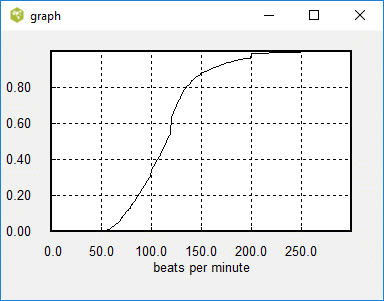
In the above graph, about 40 percent of the midi files have a tempo set at 105 or fewer beats per minute. In the next graph, the distribution of the number of beats in a midi file is shown.
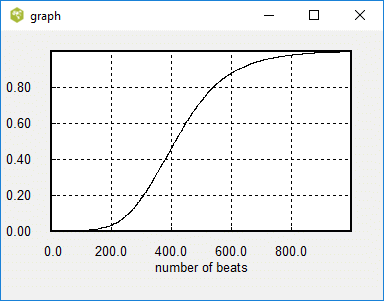
It is seen that about half of the files are 400 beats or fewer in length, while the rest are longer. The distribution of the number of pitch bends in a midi file is shown next.
About 30 percent of the midi files have no pitch bends at all.
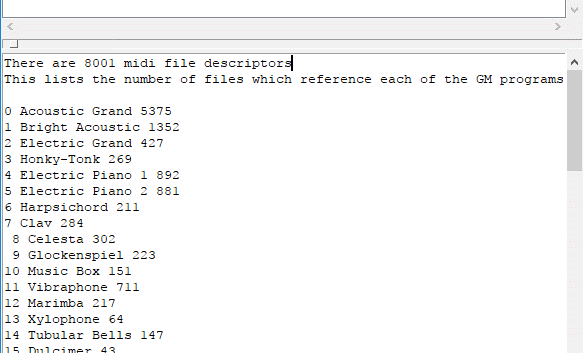
If you request the program statistics, midiexplorer will list for each of the 128 programs the number of midi files that requested that program (or musical instrument).

Settings
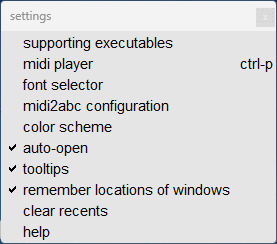
The first two options supporting executables and midi player are described in the section Running midiexplorer for the first time.
The next two settings are mainly cosmetic and control the appearance of the interface.
font selector
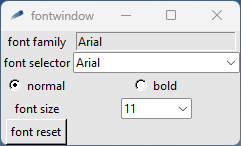
The Windows and Linux operating systems come a large selection of fonts. These fonts and sizes effect the dimensions of the widgets in the windows. For example, here is the interface appears when you choose the comic font.
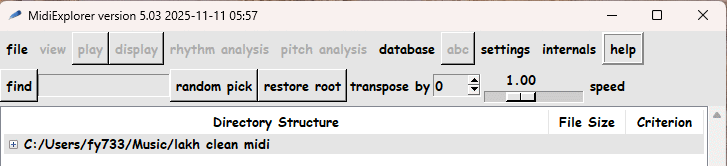
Note, some of the foreign character fonts can make the program hard to use.
Changing the font has an immediate effect on all the windows except for the font selector window. This allows you to recover from a bad choice. If midiexplorer is not useable because of a bad font, you can get back to the font selector by typing control-f.
color scheme
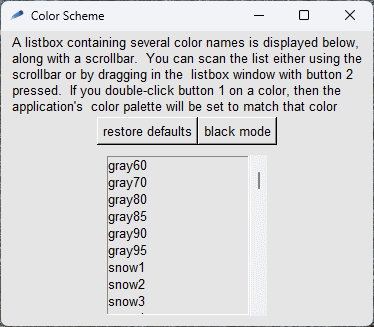
This function allows you to change the background color of all the windows exposed by midiexplorer. You can alway recover to the factory settings by clicking on the restore defaults button. The black mode buttons switches the colors to white on a black background, producing a modern look. Though the conversion is immediate, some of the interface functions such as tooltips may not work correctly unless you shut down midiexplorer and restart it. Here is an example of the interface in the darkmode.
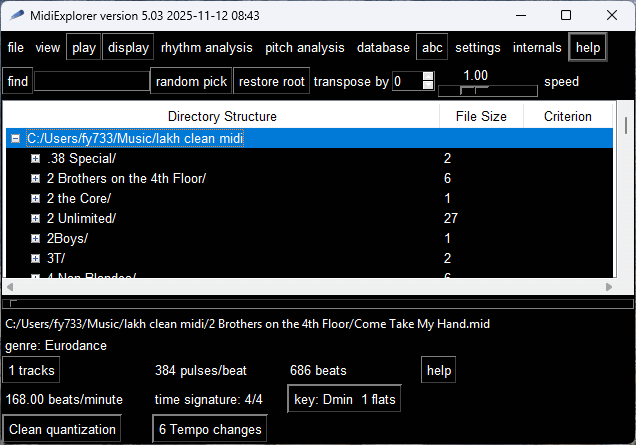
As a final remark, the white on black interface looks cool, however it was a challenge getting all the checkbuttons, radiobuttons and menubuttons working correctly in this representation. There may be a few remaining problems.
tooltips

When you hover the mouse pointer over one of the menubuttons, or button a tooltip may pop up explaining the functions available from the menubutton. This setting allows you to enable or disable this tooltip feature.
remember locations of windows
Midiexplorer exposes many different windows on the screen. You will likely need to place the window where it does not block another window. If midiexplorer remembers the placement of the window, it will automatically be put at that location the next time it is exposed.
auto-open
Many of the folders in your music database may contain only one midi file. As a convenience, you have the option of midiexplorer automatically listing the content of this folder.
midi2abc configuration
clear recent events
Operations
In order to get the maximum benefit of using this software it is useful to understand how this program works. The abcmidi/, package forms the backbone of this program. Though the main purpose of this library is to support the abc music notation, the library includes executables for handling midi files. Midi2abc has been extended to produce a textual description of the midi file (like mftext). Midicopy can convert one midi file into another midi file. Midistats extracts statistical features from the midi file. All of these executables were written in pure C code and run very efficiently. These executables can be run directly from a terminal or DOS command window.
Here are a few of the many options of midicopy.
-trks n1,n2,..(starting from 1)
-xtrks n1,n2,.. (tracks to exclude)
-xchns n1,n2,.. (channels to exclude)
-chns n1,n2,..(starting from 1)
-from n (in midi ticks)
-to n   (in midi ticks)
-fromsec %f (in seconds)
-tosec %f (in seconds)
-frombeat %f
-tobeat %f
-replace trk,loc,val
-tempo n (in quarter notes/min)
-speed %f (between 0.1 and 10.0)
When you play a particular time segment and channel from the active
midi file, midiexplorer runs midicopy to create a temporary midi file
containing this content and then forwards this temporary file to your
midi player. This is action is visible on the internals/console
function. For example,
midi_to_midi:
exec /home/seymour/abc/midicopy -chns 4,5 -from 56448 -to 76986 {/home/seymour/clean midi/Status Quo/I Didn't Mean It.mid} xVKWTnxLr.mid

216.457581

exec timidity -A 50 -ik /home/seymour/midiexplorer_home/xVKWTnxLr.mid &
The temporary file will be removed the next time you activate the play button; however, if you wish the save this midi file, click on the internals/save output midi file button.
When you click on the display button, midiexplorer generates a temporary midi file containing your desired content, then it runs midi2abc to convert that midi file to abc music notation which is encoded into a temporary xhtml file. The xhtml file is forwarded to your selected browser which converts the embedded abc notation to svg by running a remote JavaScript function, and the browser display the svg content.
create_abc_file none

copyMidiToTmp from none
exec /home/seymour/abc/midicopy -frombeat -1 -tobeat 616 {/home/seymour/clean midi/Status Quo/I Didn't Mean It.mid} tmp.mid

284.302490
exec /home/seymour/abc/midi2abc tmp.mid -sr 2 -noly -title {I Didn't Mean It}
exec firefox file:/home/seymour/midiexplorer_home/X.html &
31883
The header of the X.html file loads the JavaScript code from Jef Moine's web site, and applies this code to the abc notation embedded in the X.html file.
If you do not wish to use Jef Moine's JavaScript, you can untick the checkbox in the settings/supporting executables window. Then midiexplorer will create a temporary abc file using midi2abc. Next it will forward the file to abcm2ps which will create a temporary PostScript file Out.ps. Ghostview (gs) will take this file and convert it to a pdf file, Out.pdf. Finally firefox will display this pdf file. Here is the content of the console window.
create_abc_file none

copyMidiToTmp from none
exec /home/seymour/abc/midicopy -frombeat -1 -tobeat 452 {/home/seymour/clean midi/Divinyls/I Touch Myself.mid} tmp.mid

246.545197
exec /home/seymour/abc/midi2abc tmp.mid -sr 2 -noly -title {I Touch Myself}
abcm2ps-8.14.15 (2024-01-08)
File X.tmp
Output written on Out.ps (31 pages, 1 title, 412835 bytes)
X.tmp:603:55: warning: Line overfull (659pt of 652pt)
X.tmp:180:13: warning: Line overfull (655pt of 652pt)
X.tmp:1649:5: warning: Line underfull (262pt of 682pt)$
exec /home/seymour/abc/abcm2ps -j 1 X.tmp

exec /usr/bin/gs -dBATCH -dNOPAUSE -sDEVICE=pdfwrite -q -sOutputFile=Out.pdf Out.ps

exec firefox file:/home/seymour/midiexplorer_home/Out.pdf &
32795
When you select a midi file, midiexplorer runs the midistats executable on
this file which analyzes the characteristics of the file and forwards
this information back to midiexplorer. In order to accommodate the
many types of midi files, the output is quite complicated. (Try
Internals/midistats output.) Midiexplorer sifts through this
information, producing the various tables and plots (eg. track info
and detailed track info). In addition midiexplorer attempts to determine
which track (or channel) carries the melody, which track has the
bass line, and which track contains the chordal accompaniment.
When you create a midi database (Database/create database, midistats is called for each file in your collection and gathers the information that it will record in the file MidiDescriptors.txt in the main directory of your midi database. This file is used when you search for a midi file with specific characteristics.
Midistats gathers both global and channel (track information) to be used in a summary. A lot of the information is time dependent. For example, the key of the song can move around. The melody can also shift among the different instruments. The music can be divided into various sections like introduction, chorus, verse, bridge, and coda. In order to keep, the execution time short midistats does not do a deeper analysis. It is presently, done by midiexplorer.